AMERICAN AUDIO VMS2
SETUP
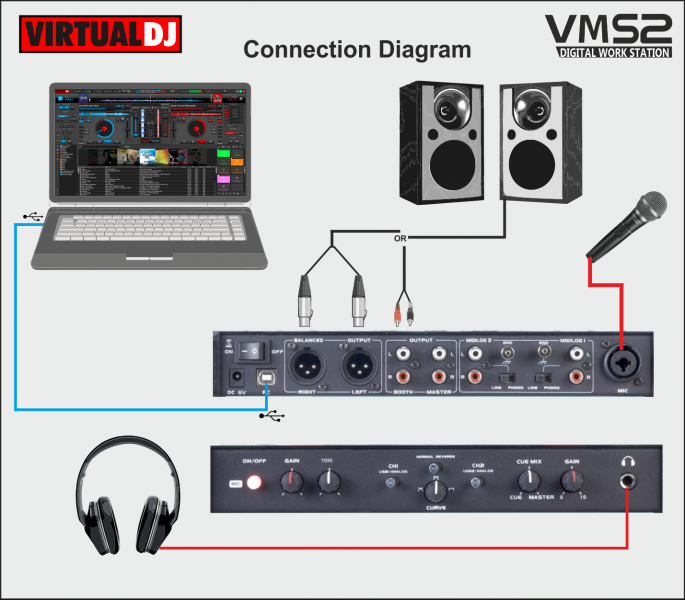
Drivers: Connect VMS2 with a USB port of your computer and install the latest ASIO drivers (for Windows only) from http://www.adj.com/vms2 (Download tab)
Setup: Connect your amplified speakers or your amplifier to the Master (RCA or XLR) outputs at the rear side and power on the unit from the back switcher. Connect your Headphones at the front side and make sure both MIDILOGS switchers (M) at the front are on USB position.
VirtualDJ 8 Setup
Install VirtualDJ 8 LE from http://www.virtualdj.com/le/ in case your VMS2 came with a Limited Edition of VirtualDJ (will install the tailored GUI).
Once VirtualDJ 8 is launched, a Login Window will appear. Login with your virtualdj.com account. A Pro Infinity, a PLUS License, a Pro Subscription or a LE Keycode (provided with VirtualDJ LE) is required to use the American Audio VMS2. Without any of the above Licenses, the controller will operate for 10 minutes each time you restart VirtualDJ.
http://www.virtualdj.com/buy/index.html

If your VMS2 came with a VirtualDJ LE Keycode, use the Enter Keycode button to enter it. If a Pro Infinity or Plus license is available and you have logged in the previous window, this button will not be available.
Click OK.
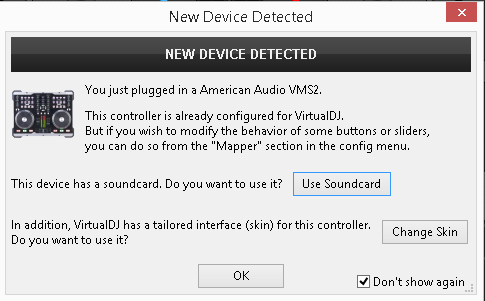
The unit is now ready to operate.
Advanced Setup
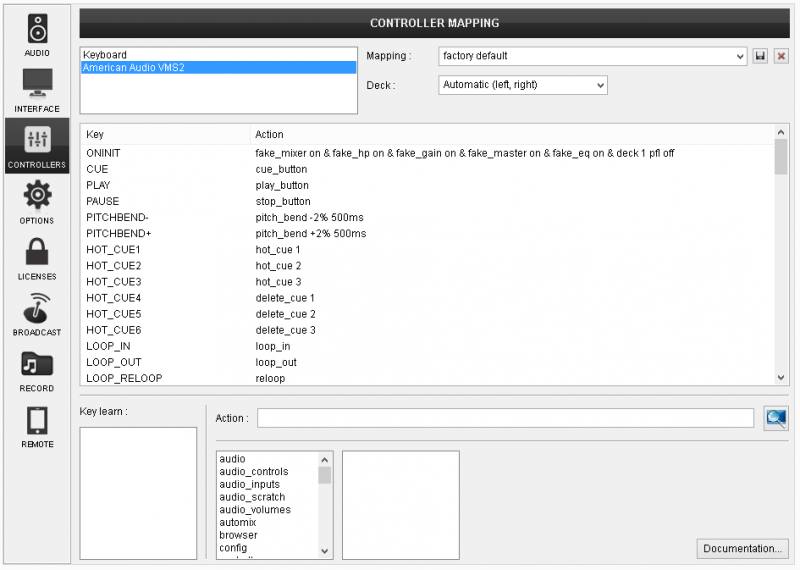
The unit should be visible in the CONTROLLERS tab of Config and the “factory default” available/selected from the Mappings drop-down list. The factory default Mapping offers the functions described in this Manual, however those can be adjusted to your needs via VDJ Script actions.
A Pro Infinity, a Pro Subscription or a PLUS license is required to customize the mapping of the VMS2.
Find more details at
http://www.virtualdj.com/wiki/VDJ8script.html
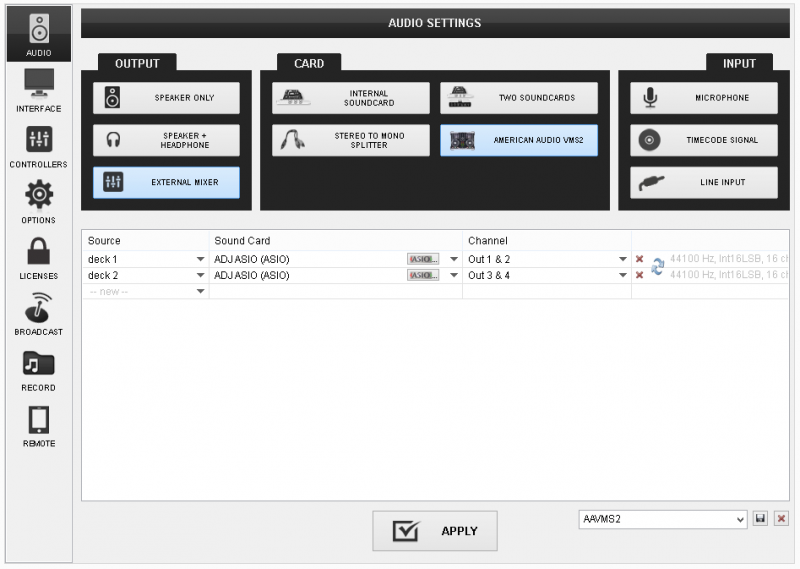
The unit has a pre-defined Audio setup and a special button in the AUDIO tab of Config to provide that. Alternative Audio setups can be applied in the same window (see Advanced Audio Setup).
Please read the manual of the unit for further Audio capabilities-setups.
INTERFACE (Skin)
The tailored skin of the American Audio VMS2, which is automatically loaded with VirtualDJ 8 LE version, is also available for download at http://www.virtualdj.com/plugins/index.html?addonid=80286 for those who do not wish to install the LE version from the mentioned link.
For further VirtualDJ settings and features please refer to the User Guide of VirtualDJ 8.
http://www.virtualdj.com/manuals/virtualdj8/index.html
LAYOUT
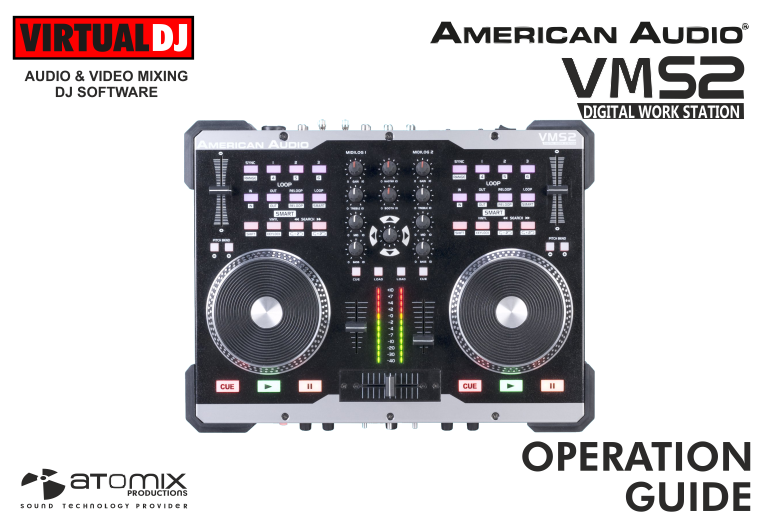
S. SHIFT. Press and hold this button to access secondary functions of other controls on the VMS2.
M. MIDILOGS. Set those switchers to USB position in order the audio of the corresponding VirtualDJ deck to be routed from the USB audio interface. Set to Analogue position to allow for an external media source (such as CD/MP3 player) to be routed to the corresponding mixer channel.

The functionality of each button, knob and connection per section (as shown in the image above) will be explained in detail in the next chapters
A. Mixer Controls
B. Browser Controls
C. Deck Controls
D. Rear Panel
E. Front Panel
MIXER
The mixer of the VMS2 is routing and handling the sound internally (hardware), but all the adjustments and movements are visible on the VirtualDJ GUI.
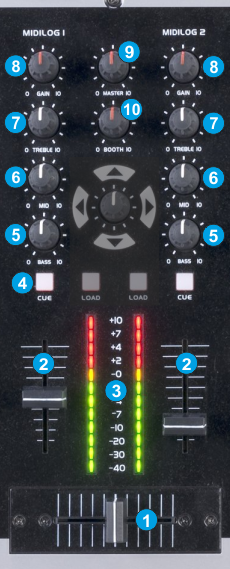
- CROSSFADER. Blends audio between the left and right channels
- VOLUME. Adjust the Volume of each Midilog/Deck.
- VU METERS. Indicate the level of the Master Output. If a CUE/PFL button is selected, the VU METERS will indicate the level of the selected Midilog/deck.
- CUE/PFL. Press these buttons to send left or/and right Midilogs/decks to the Headphones Output channel.
- BASS (EQ). Adjust the Low frequencies for each Midilog/deck. See more in EQ Mode.
- MID (EQ). Adjust the Middle frequencies for each Midilog/deck. . See more in EQ Mode.
- TREBLE (EQ). Adjust the High frequencies for each Midilog/deck. See more in EQ Mode
- GAIN. Adjust the Gain of each Midilog/deck
- MASTER VOLUME. Adjust the level of the Master Output.
- BOOTH VOLUME. Adjust the level of the Booth Output.
BROWSER
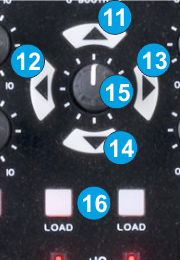
- NAV.UP: Press this button to set the NAV.ENCODER (5) to Left Effect control mode.
- NAV.LEFT: Press this button to set focus to the Folders list of Browser. If focus is on the Folders list, use this button to open/close subfolders.
- NAV.RIGHT: Press this button to set focus to the Songs list of Browser.
Hold SHIFT down and then press this button to set focus to the Sideview.
If focus is on Sideview, use the same button combination to cycle through the available views of Sideview (Automix, Sidelist, Karaoke, Sampler and Shortcuts). The SHIFT functionality is not available in LE mode. - NAV.DOWN: Press this button to set the NAV.ENCODER (5) to Right Effect control mode.
- NAV.ENCODER: The Encoder offers different functionality depending on the selected mode. When the NAV.UP or NAV.DOWN buttons are selected, the NAV. Encoder will be in Effects mode and will be in Browser mode if the LEFT and RIGHT Navigation buttons are selected.
Note that since these buttons do not offer any feedback (due to the lack of LEDs), the tailored skin of VirtualDJ LE will offer indications for the selected mode.
In Browser mode
Use the encoder to scroll through files or folders.
Push the encoder to toggle between Normal and Zoomed Browser view. Note that the Zoomed Browser mode is offered only with the tailored skin of the VMS2
In Effects mode
Use the encoder to select an Effect for the left or right deck.
Push the Encoder to enable the selected Effect for the left or right deck.
While the Effect is enabled, use the Encoder to adjust the 1st Parameter of the selected Effect. Hold SHIFT down and then use the encoder to adjust the 2nd Parameter of the Effect.
In All modes
Hold SHIFT and then push the Encoder to cycle through the Center Mixer panels of the GUI (Audio, Video, Scratch and Master) - LOAD. Use these buttons to load to the left or right deck the selected track from Browser. Hold SHIFT and then use the same buttons to unload the same deck.
DECKS
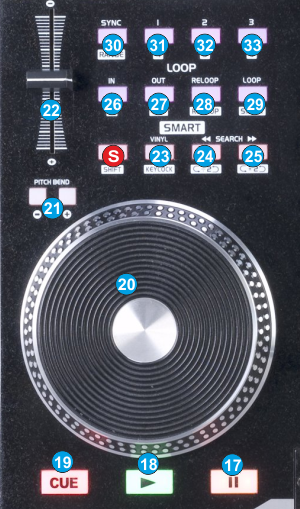
- PAUSE. This button operates depending on the selected Stop Button behavior (setting available in Deck Options in both default and tailored VirtualDJ GUI). By default, press this button to pause the track if playing. If the track is paused, press this button to cycle though the available stored Cues.
Hold SHIFT and then use this button to stop the track at its beginning. - PLAY. This button operates depending on the selected Play button mode (setting available in Deck Options in both default and tailored VirtualDJ GUI). In default (Play-Stutter) mode, press this button to play the track if pausing or play-stutter from the previous stopped point if the track is playing.
Hold SHIFT down and then use this button to play the track in reverse. Repeat to play the track forward again. - CUE. This button operates depending on the selected Cue Button mode (setting available in Deck Options).
In default mode when the Deck is paused, you can set a temporary Cue Point. During playback, you can press the Cue Button to return the track to this Cue Point. (If you did not set a Cue Point, then it will return to the beginning of the track.).
If the Deck is paused, you can press and hold the Cue Button to play the track from the Temporary Cue Point. Releasing the Cue Button will return the track to the temporary Cue Point and pause it.
To continue playback without returning to the Temporary Cue Point, press and hold the Cue Button, then press and hold the Play Button, and then release both buttons.
A different behavior (e.g. Cue-Hold or Cue-Cup) can be selected from the Deck Options - JOG. Touch-sensitive jogwheel for scratching (Vinyl Mode), pitch bending (CD mode) and other functions described in this manual. If the jogwheel is on Scratch (Vinyl) mode, use the outer ring of the jogwheel to pitch-bend.
The jogwheel is also an aid to adjust the Loop In and Loop Out points or move the Loop through the track. See Loop buttons. - PITCHBEND-/+. Press and keep this button down to temporary slow-down/speed-up the tempo of the track. When the button is released, the track will return to the tempo defined by the pitch slider. Hold SHIFT down and then use the same button to slow-down/speed-up the track more intensively
- PITCH. Adjust the track's playback speed (tempo).
The actual pitch fader will not alter the pitch of the track if the actual pitch and the software pitch value do not match (software soft-takeover, ghost fader visible on the GUI). In most cases this may happen if SYNC is prior pressed. - VINYL. Press this button to set the Jogwheel to Vinyl (Scratch) or CD (Bend) mode. In Vinyl mode, use the outer part of the Jogwheel to bend (temporary speed up – slow down the tempo of the track).
Hold SHIFT down and then press this button to "lock" the track's pitch to its original key. (Master Tempo). The track's tempo will remain at the speed designated by the Pitch Fader. - SEARCH<<. Press and hold this button to move the track backwards by 4 beats. Hold SHIFT down and then use this button to half the size of the Loop. If a Loop is triggered use this button to half the size of the loop. The Led of the button will be lit if a Loop is enabled to indicate the secondary function.
- SEARCH>>. Press and hold this button to move the track forward by 4 beats. Hold SHIFT down and then use this button to double the size of the Loop. If a Loop is triggered use this button to double the size of the loop. The Led of the button will be lit if a Loop is enabled to indicate the secondary function.
- LOOP IN. Press this button to set a Loop In (Entry point). Hold SHIFT down and then press this button to set the Jogwheel to Loop In mode and (fine) adjust the Loop In point using the jog when a loop is enabled. The Led of the button will blink to indicate the Loop In Wheel mode. Press again to return the Jogwheel to Jog mode.
- LOOP OUT. Press this button to set a Loop Out (Exit point). Hold SHIFT down and then press this button to set the Jogwheel to Loop Out mode and (fine) adjust the Loop Out point using the jog when a loop is enabled. The Led of the button will blink to indicate the Loop Out Wheel mode. Press again to return the Jogwheel to Jog mode.
- RELOOP. Press this button to trigger the last enabled Loop (reloop). Hold SHIFT down and then press this button to set the Jogwheel to Loop Move mode and move the Loop through the track using the jog when a loop is enabled. The Led of the button will blink to indicate the Loop Move Wheel mode. Press again to return the Jogwheel to Jog mode.
- LOOP. Press this button to enable/disable a Loop of the selected size. Hold SHIFT down and then use this button to enable/disable the Smart Loop (for seamless looping)
- SYNC. Press this button to automatically match the corresponding Deck's tempo with the opposite Deck's tempo and phase. Hold SHIFT down and then press this button to adjust the range of the Pitch Fader ( to ±6%, ±8%, ±10%, ±12%, ±20%, ±25%, ±33%, ±50%, and ±100%).
- -33. HOTCUES (1-3). The 3 buttons assign a Hot Cue Point (1 to 3) or return the track to that Hot Cue Point. When a Hot Cue Button is unlit, you can assign a Hot Cue Point by pressing it at the desired point in your track. Once it is assigned, the Hot Cue Button will light red. To return to that Hot Cue Point, simply press it.
Press and hold SHIFT and then press a Hot Cue Button to delete its assigned Hot Cue Point.
REAR PANEL

- POWER: Use the included power adaptor to connect VMS2 to a power outlet. While the power is switched off, plug the cable into VMS2 first, and then plug the cable into a power outlet. Use the Power Switch to turn the VMS2 on and off. Turn on VMS2 after all input devices have been connected and before you turn on amplifiers. Turn off amplifiers before you turn off VMS2.
The power connection is not necessary if the unit is only used as a Midi controller; however it is strongly advised to be used. - USB. This USB connection sends and receives audio and control information from a connected computer.
- MASTER OUTPUT (XLR): Connect this low-impedance XLR output to a PA system or powered monitors. The level of this output is controlled with the Master knob on the top panel.
- BOOTH OUTPUT (BALANCED): Use standard RCA cables to connect this output to a booth monitoring system. The level of this output is controlled by the Booth knob on the top panel.
- MASTER OUTPUT (RCA): Use standard RCA cables to connect this output to a speaker or amplifier system. The level of this output is controlled by the Master knob on the top panel.
- MIDILOG 1 INPUT. Connect your audio sources (line-level or phono-level signal) to these inputs.
- MIDILOG 2 INPUT. Connect your audio sources (line-level or phono-level signal) to these inputs.
- MIC INPUT. Connect your 1/4" or XLR microphone to this input. Microphone controls are located at the front Microphone panel.
FRONT PANEL

M. MIDILOG SWITCHER. Turn the switcher to the USB position in order the audio of the corresponding VirtualDJ deck to be routed from the USB audio interface. Turn the switcher to ANALOGUE position to use a Midilog as an analogue input source. In this position the sound of the VirtualDJ deck will be muted.
- MIC ON. Turn On/Off the Microphone Input of the unit.
- MIC GAIN. Adjust the Volume of the Microphone Input of the VMS2 (rear connection)
- MIC TONE. Adjust the Tone of the Microphone Input of the VMS2.
- NORMAL-REVERSE. Switch to REVERSE position if you wish the crossfader to operate in reverse mode (Hamster)
- CROSSFADER CURVE. Define how the crossfader will blend left and right channels (from Smooth to Scratch curve).
- CUE MIX. Adjust how the mixer Channels and the Master Output blend at the Headphones Channel. Hardware operation, but movement visible on the VirtualDJ GUI.
- CUE GAIN. Adjust the Volume Output of the Headphones Channel. Hardware operation, but movement visible on the GUI.
- HEADPHONES. Connect your Headphones
EQ mode
The Equalizer (Treble, Mid & Bass) section of the VMS2 can work in two different modes, Pre EQ and Post EQ.
How to:
To toggle between the 2 EQ modes, press and hold the FORWARD SEARCH button (25) on the right deck and then power "ON" the unit. Release the button. Your computer may reinstall the VMS2 as a new device, please allow 10-20 seconds for the change to take place.
You can verify the change from the ASIO Settings Utility (Windows only)
In Pre EQ the USB audio signal is affected by the VMS2 EQ. Pre EQ is the default EQ. In
Pre EQ mode the ASIO Driver will list the VMS2 device number, the first number in the sequence will be a "0"
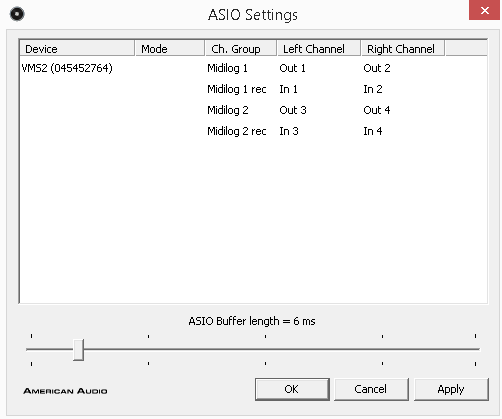
Post EQ is for users who prefer using the EQ from VirtualDJ instead of the Hardware one (e.g. to get the parametric EQ of VirtualDJ 8).
In Post EQ mode the ASIO Driver will list the VMS2 device number, the first number in the sequence will be a "1"

If the Post EQ mode is selected, you will also need to modify the ONINIT key of the Mapping files (or at least the one that you need to use – Default or Browser mode).
How to:
Launch VirtualDJ 8 and head to the CONTROLLERS tab of Config. Select the American Audio VMS2 from the left devices list and select the mapping file you wish to use (and modify). Locate the ONINIT key from the middle Key list (you can also sort by Key for easier search).
Click on the ONINIT key to get the pre-assigned action in the Action field.
Edit the fake_eq on action to fake_eq off
Once the change is done, a modified (custom) mapping will be auto-created which can be renamed as well from the top-right field.
Re-launch VirtualDJ 8 or choose a different mapping and back the one you edited again, in order the assigned action of the ONINIT key to be applied.
To verify that the “fake” EQ is off and the VMS2 is now controlling the VirtualDJ Internal EQ (for both Windows and Mac), the EQ knobs should not now kill the sound if all 3 EQ Band knobs are at the far left position and the EqualizerMode setting is set to Default from the OPTIONS.
Recording & Broadcasting
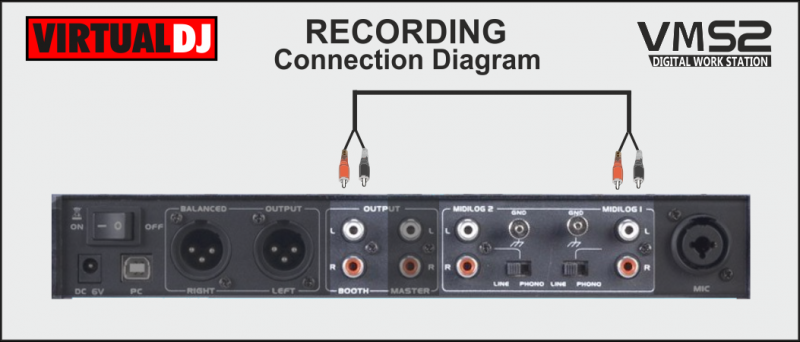
VirtualDJ will not be able to record (or broadcast) your mixing directly as the audio mixing is handled by the VMS2. In case you need to record (and/or broadcast) your mixing along with the Microphone Input of the VMS2, you will need to:
- Connect the BOOTH Output of the VMS2 with an Input of a different sound card (e.g. the built-in of your computer) or an Input of the VMS2. In the following example the BOOTH Output is routed to the MIDILOG 1 Input of the VMS2 using a proper RCA cable.
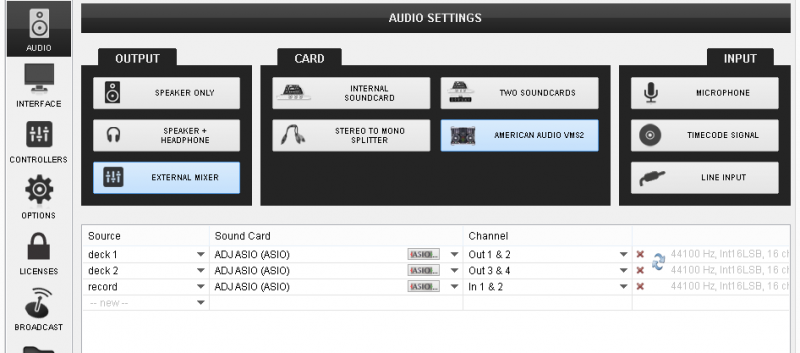
- Manually add a record line to the Audio configuration by assigning to the Input channel of the used sound card. In the following example, the Input of the MIDILOG1 is used.
Timecode (DVS)
The VMS2 is capable to offer a Timecode setup (DVS) with its built-in 4out/4in audio interface. Timecode operation requires a Pro Infinity or a Pro subscription license.
How to:
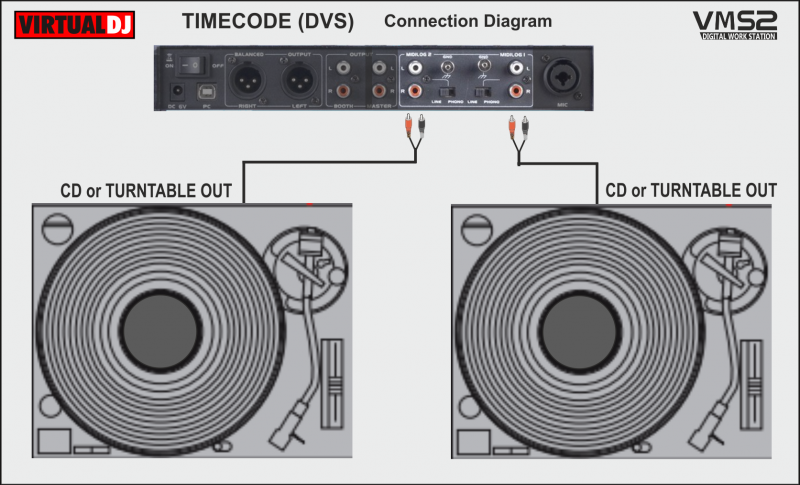
- Connect Turntables or CD Players with Timecode Vinyl or CDs to the MIDILOGs 1 and 2 Inputs using proper RCA cables. Select PHONO or LINE depending on the used DVS type as per the following diagram
- Open VirtualDJ 8, head to the AUDIO tab of Settings and click on the TIMECODE SIGNAL button you will find at the INPUTS tab of the Audio Settings.
2 additional lines will be automatically added to the audio configuration.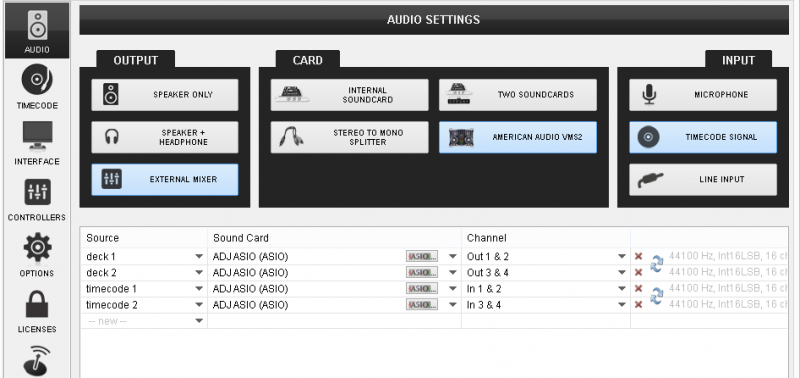
Timecode Audio setup - Click to APPLY.
