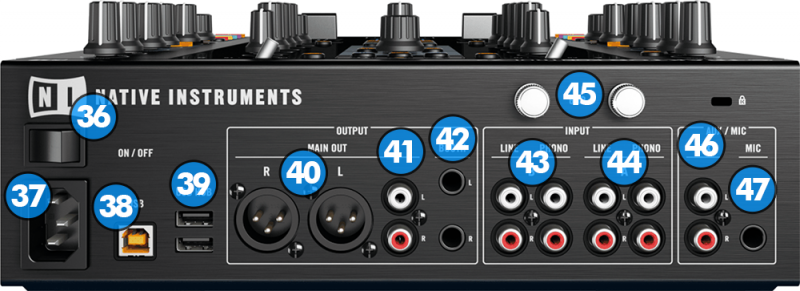
POWER SWITCH: Turns on/off the power on the device.
POWER INPUT: Connect the supplied power cord.
USB CONNECTOR: Use a standard USB cable to connect Kontrol Z2 with your computer.
USB HUB: Use these USB ports to connect up to two other devices with your PC.
BALANCED (XLR) OUTPUTS: Use these connectors to connect your device on a PRO grade amplifier or self-powered (active) speakers.
RCA OUTPUTS: Use these connectors to connect your device on another mixer or consumer grade amplifier.
BOOTH (TRS) OUTPUTS: Use these connectors to connect your device on your booth monitor speakers or amp.
CHANNEL 2 INPUTS: Connect a turntable or a CD player to channel 2. You can control which of the two sources gets heard or routed to the VirtualDj’s timecode engine by flipping the PHONO/LINE (9) switch on the top of the mixer.
CHANNEL 1 INPUTS: Connect a turntable or a CD player to channel 1. You can control which of the two sources gets heard or routed to the VirtualDj’s timecode engine by flipping the PHONO/LINE (9) switch on the top of the mixer.
GROUND CONNECTORS: Connect your turntable’s ground connectors (if available) to eliminate ground static noise.
AUXILIARY INPUT: Connect any line level auxiliary source.