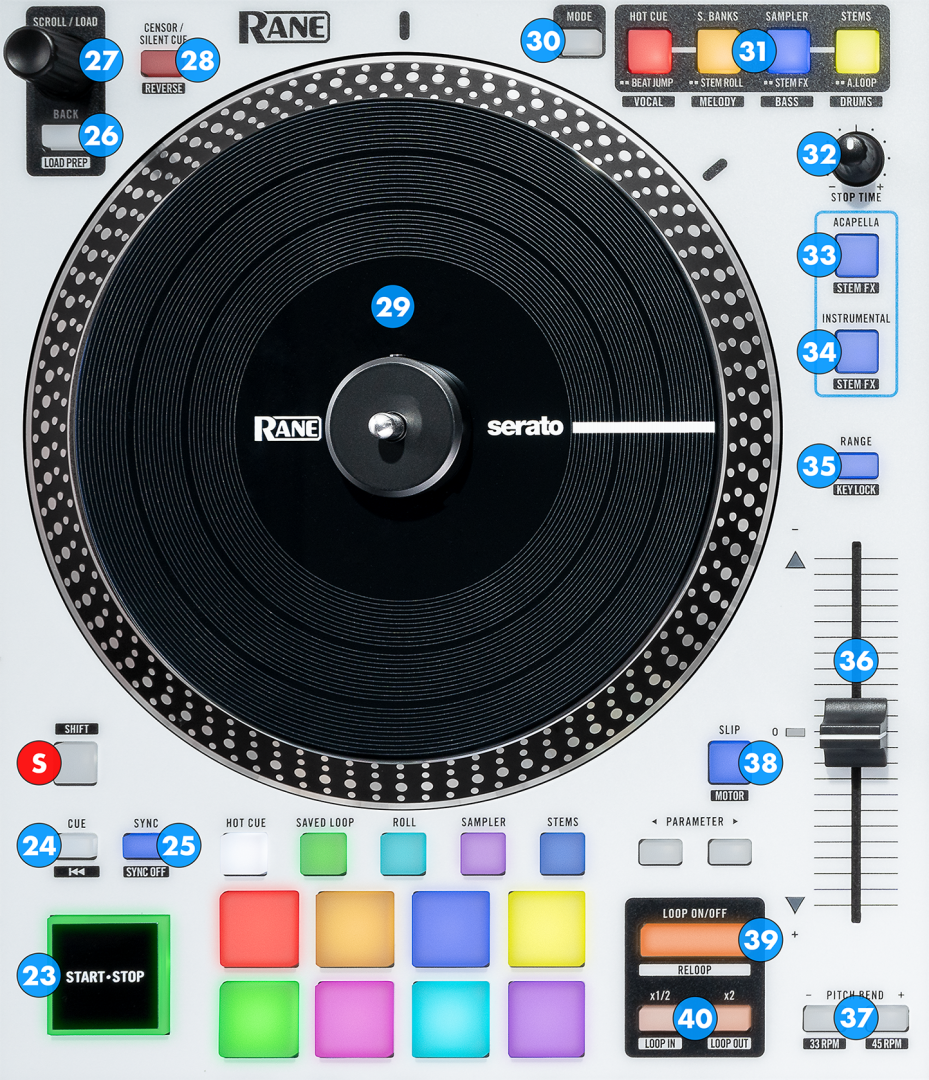
START/STOP. Press this button to start or stop the playback of the track. Hold down SHIFT and press this button to ply-stutter the track.
CUE. Set a temporary Cue point when track is paused. Stop the track at temporary position when playing and preview from Cue position while pressed. Hold down SHIFT and press this button to the beginning of the track.
SYNC. Match the BPM and smoothly catch up the Phase, in order to synchronize this Deck to the opposite Deck. Hold down SHIFT and press this button to smoothly reset Track's tempo (BPM) to its original value.
BACK. Sets focus to Folders list. If focus is in Folders list, open/close sub-folders. Hold down SHIFT and press this button to add the selected Track of Browser to the Automix List
SCROLL/LOAD. Scroll through files/folders. Push to load the selected track to Left/Right Deck. Hold down SHIFT to scroll fast (+/-10 tracks per click) Hold down SHIFT and push to load and clone the Track from the opposite Deck
CENSOR/SIL.CUE. This button offers two different modes. When in "CENSOR" mode use the button to play the track in reverse while pressed. When released, the track will resume playback from the position it would have been if never triggered. When in "SILENT CUE" mode press this button to mute the sound of the deck. Press once again or use any of the hotcue Pads to restore the sound. To change the button mode please enter the device menu and select SILENT CUE->SWAP CENSOR Hold down SHIFT and press this button to play Track in reverse. Press again to return to normal playback
MOTORIZED PLATTER. High precision motorized platter for true vinyl emulation.
MODE. Press this button once to enter "Auxiliary Pads Selection Mode". The button's LED will start to blink. Click or Double-click one of the "AUX Pads " to select their mode of operation. The button's LED will stop blinking. While "Auxiliary Pads Selection Mode" is active, press this button once again to exit the selection mode.
AUX Pads . These four buttons provide different operation depending on the current "AUX Pads MODE" To select the "AUX Pads MODE" press the MODE button once, and while the MODE button is blinking, Click or Double-Click one of these buttons to select one of the available modes. The available options are Hotcues, Scratch Banks, Sampler and Stems for single Click, and Beatjump, Stem Roll, Stem FX and Auto Loop for Double Click. In each mode the buttons operate as per the table below:
AUX Pads MODE
ACTION
SHIFT (SECONDARY) ACTION
SELECTSelect one of the available modes, by using simple or double click.N/AHOT CUESet a hotcue (if it doesn't exist) or jump to a hotcue (if it exists) and resume playback.Delete a hotcue. Scratch BANKSLoad a Scratch BankUnload a Scratch Bank Sampler Play a sample depending on current Sampler playback mode.Stop a sample from playing. Stems Mute a Stem .Isolate a Stem (mute all the other Stems ).BEATJUMPJump back and forth inside the track in beats.Jump back and forth inside the track in beats. Stem ROLLApply a Loop Roll effect on the "Vocal" Stem , only while the buttons are pressed.Apply a Loop Roll effect on the "Vocal" Stem , and hold it, until the buttons are pressed again (toggle). Stem FXApply predefined effects on predefined Stems .Apply predefined effects on predefined Stems .AUTO LOOPSet a predefined automatic loop.Set a predefined automatic loop.
STOP TIME. Adjust the time required for Track to completely stop. When at minimum position, the Track will stop instantly.
ACAPELLA. Press this button once to isolate the vocal part of a track. Press a second time to restore the full sound. Hold down SHIFT and press this button to isolate the vocal part of a track by using an "Echo Out" effect on the instrumental part.
INSTRUMENTAL. Press this button once to isolate the instrumental part of a track. Press a second time to restore the full sound. Hold down SHIFT and press this button to isolate the instrumental part of a track by using an "Echo Out" effect on the vocal part.
RANGE. Cycle through the available range % for Pitch/Tempo fader. A bigger pitch range will give you a bigger range of possible BPM matches, but the pitch slider movement will be less accurate. Hold down SHIFT and use this button to toggle Keylock. When enabled, the Key of the track will retain its value when Tempo is changed.
TEMPO. Adjust the Tempo (BPM) of the Track. In middle position, the Track will have the original Tempo.
PITCH BEND. Temporary (while pressed) slow-down/speedup Track. When released, Track's tempo will resume to the value designated by the Pitch fader. Hold down SHIFT and use these buttons to switch the motor of the platter between 33 and 45 RPM
SLIP. Enable/disable Slip mode. When enabled, operations like scratching, loop, hotcues etc will act temporarily and track will resume playback from the position it would have been if never triggered. Hold down SHIFT and use this button to turn the motor of the platter on/off
LOOP ON/OFF. Enable/disable an automatic loop of the selected beats size. Hold down SHIFT and use this button to enable the last triggered loop (reloop)
LOOP HALF/DOUBLE. Use these buttons to halve or double the size of the automatic loop. Hold down SHIFT and use these buttons to set the Entry and Exit (In/Out) points for manual looping.