


RMX90
INPUTS & RECORDING
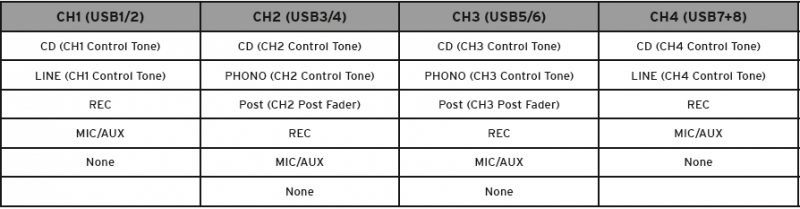
USB Channel assign
The Reloop RMX90 offers a built-in audio interface with 4 stereo Outputs and 4 stereo Inputs. The Outputs are determined by the SOURCE SELECT switchers at the top panel of the unit.
The USB Input Channels (sent to computer) can be set to different modes via the Utilities. Depending on the selected Source for each USB Channel, the inputs of the RMX90 can be used for DVS (Timecode), AUX Inputs to a VirtualDJ Deck, Recording input etc.
- Hold both FADER START and XFADER START buttons for more than 3 seconds, until the LCD displays "USB OUT / Channel 1".
- Push the FX SELECT rotary to select this setting and adjust its value.
- Use the FX SELECT rotary to navigate through the available USB Channels 1 to 4.
- Push the FX SELECT rotary to select the USB Channel that you wish to modify its source.
- Turn the FX SELECT rotary and choose between the available Sources (see table below)
- Push the FX SELECT rotary to apply your choice.
Timecode (DVS)
VirtualDJ is offering DVS (Digital Vinyl System) support for the Reloop RMX90. A Timecode Plus or Pro Infinity license is required. https://virtualdj.com/buy/ Up to 4 Timecode Inputs are available to control any software decks via Timecode CDs or Vinyls.
Mixer Channels CH2 and CH3 (middle ones) can accept PHONO (Timecode Vinyls). CD/LINE (Timecode CDs) can be accepted in all 4 available Channels.
Connect your Timecode devices at the rear panel of the Reloop RMX90 to the Inputs CH 1 to 4 and make sure the SOURCE switchers at the top panel are set to USB position.
Use the Utilities of the RMX90 to set the respective USB Channels to CD/PHONO depending on the connected DVS device.
Example 1:
In this example, 2 xTimecode Vinyls (turntables) have been connected to CH2 and CH3 and 2 x Timecode CDs have been connected to CH1 and CH4.
From the Utilities of the RMX90, we have set USB Channel1 to CD, USB Channel 2 and 3 to PHONO, and USB Channel 4 to CD. (See how, at the top of this chapter)
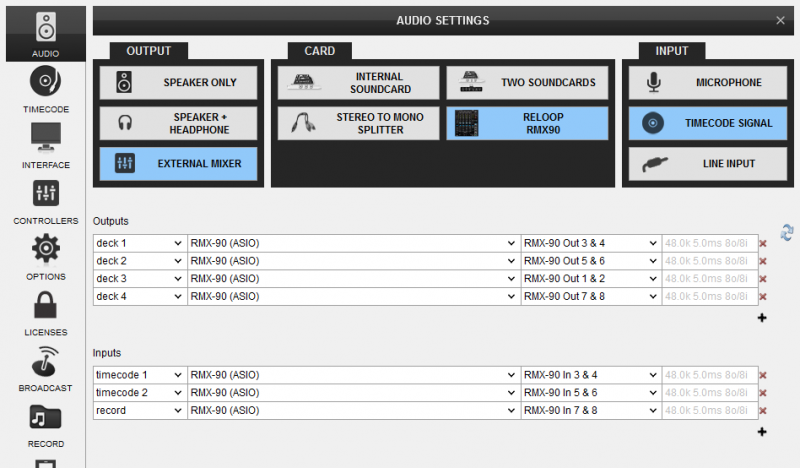
Open the AUDIO tab of VirtualDJ Settings and click on the TIMECODE button. By default VirtualDJ will auto-create 2 Timecode Inputs. Add 2 more Timecode Input lines and select the appropriate Input Channels as per the image below
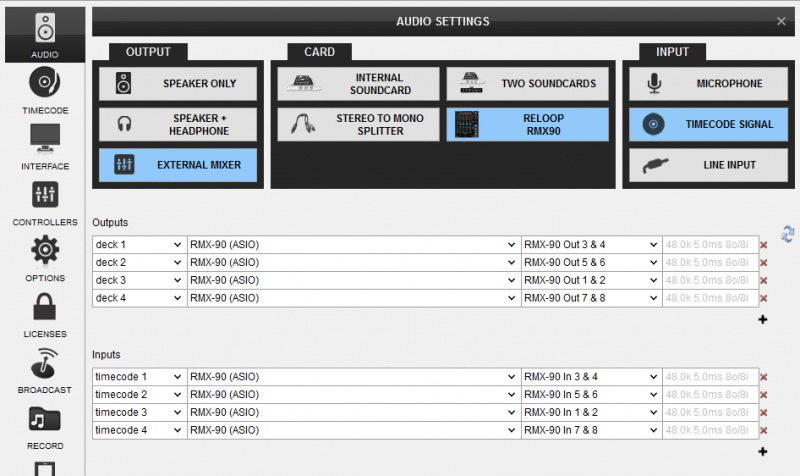
Click to APPLY.
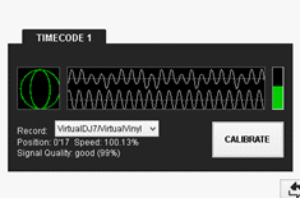
Press PLAY on your timecode CD and/or Vinyl device and VirtualDJ will automatically detect your Timecode type and make the appropriate adjustments for best performance.
Open the TIMECODE tab of the VirtualDJ Settings and choose the CALIBRATE button if for any reason the signal is not detected (possibly due to reversed phase connections).
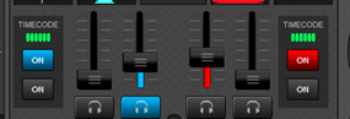
Click on the ON buttons from the TIMECODE panels of the Default Skin (in the Scratch center panel) to enable the Timecode control to any of the 4 software decks.
Example 2 :
In this example, 2 x Timecode Vinyl DVS devices have been connected to CH2 and CH3 at the rear panel of the Reloop RMX90 and PHONO has been selected as Source for USB Channels 2 and 3 via the RMX90 Utilities menu.
REC has been chosen as Source for the USB Channel 4 in this example. See Recording.
Recording
Any of the 4 available USB Channels of the Reloop RMX90 audio interface can be used to Record your Main Mix along with Microphone/Aux Inputs.
- Use the Utilities of the RMX90 and select the REC option for any of the USB Channels
In this example, USB Channel 4 has been selected as REC source - Open the AUDIO tab of VirtualDJ Settings and manually add a “ Record ” line to your current audio configuration. Select the Reloop RMX90 sound card and the same Input Channels from the Setting Utility (in this case IN 7&8), as per the following image.
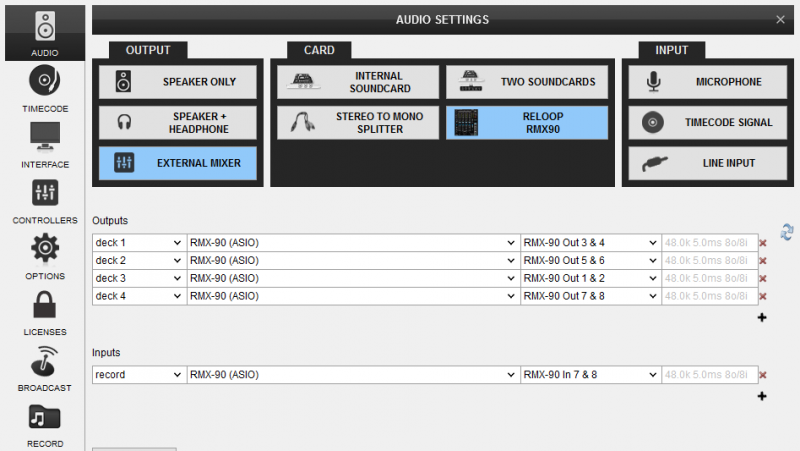
Reloop RMX90 - Audio Setup with Record line - Click to APPLY
- Open the Master center panel of the VirtualDJ GUI and click to the REC button (or BCAST for broadcasting) to Record your mix.