


Kontrol X1 MK2
KONTROL X1 MKII
BASIC CONTROLS
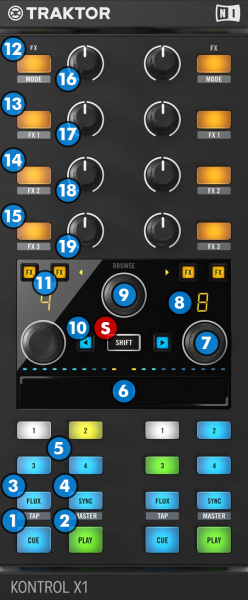
- S SHIFT : Hold this button down to access secondary functions of Kontrol X1 MKII
- CUE: When the Deck is paused, you can set a temporary Cue Point by using the TOUCHSTRIP (6) to place the Audio Pointer at the desired location and then pressing the Cue Button.
During playback, you can press the Cue Button to return the track to this Cue Point. (If you did not set a Cue Point, then it will return to the beginning of the track.).
If the Deck is paused, you can press and hold the Cue Button to play the track from the Temporary Cue Point. Releasing the Cue Button will return the track to the temporary Cue Point and pause it. To continue playback without returning to the Temporary Cue Point, press and hold the Cue Button, then press and hold the Play Button, and then release both buttons. - PLAY/PAUSE: Plays / Pauses the track.
- FLUX: Enables Slip Mode. Several software functions (such as HotCues and Loops ) will apply temporarily on the track, and the track will return to the position it would have been if those functions were not triggered.
Hold down SHIFT and tab this button a few times to set a new BPM for the track (in case automatic BPM detection got it wrong) - SYNC: Press this button to automatically match the corresponding Deck's tempo with the opposite Deck's (or the Master Deck’s if using a 4 decks Skin) tempo and phase.
Hold down SHIFT and press this button to set this deck as Master Deck (for 4 decks skins)
Hold* down SYNC button and then use the LOOP SIZE rotary [7] to adjust the BPM of the track. See LOOP SIZE.
*Note: if the SYNC button is released without the LOOP SIZE rotary [7] being touched, the Sync action will be performed. - HOTCUE/SAMPLER: These buttons offer two different operation modes:
On HotCue mode each one of the 4 buttons assigns a Hot Cue Point or jumps the track to that Hot Cue Point (if assigned). When a Hot Cue Button is unlit, you can assign a Hot Cue Point by pressing it at the desired point in your track. Once it is assigned, the Hot Cue Button will light on.
Hold SHIFT and then press a button to delete its assigned Hot Cue Point. .
On Sampler mode each one of buttons Pads triggers a sample from the selected Sampler Bank of VirtualDJ. If a bank has less than 5 samples, both sides will control the same samples. If a bank has more than 4 samples, the left side will control samples 1 to 4 and the right side samples 5 to 8. Press the buttons to trigger a sample.
Hold SHIFT and press a button if you want to stop playing the selected sample.
You can switch between the 2 different modes of operation by holding down SHIFT and pressing the LOAD (10) button on each deck. - TOUCHSTRIP: The Touchstrip can operate in Single or Dual (default) mode. Use SHIFT+ FX1/FX2 ASSIGN buttons [11] to select one or the other.
How to toggle between the 2 modes
While SHIFT is held down :
- If the FX1/FX2 ASSIGN buttons [11] are unlit, the Dual (default) mode is selected.
- Press the left FX1/FX2 ASSIGN buttons [11] to set the touch-strip to the Single mode and at the same time select the left deck, or the right FX1/FX2 ASSIGN buttons [11] to set the touch-strip to the Single mode and at the same time select the right deck
- While in Single mode (left or right FX1/FX2 ASSIGN buttons [11] are lit), press one of the unlit buttons to select the other deck, or press one of the currently lit buttons to return to the Dual mode.
The small dots above the touch-strip will indicate the selected mode (left half blue - right half orange for Dual mode or blue/orange for Single mode depending on the selected deck.
In Single mode : the entire touch-strip applies to the selected deck. Deck selection is done via SHIFT+FX1/FX2 ASSIGN buttons [11] or from the A/B select buttons on the VirtualDJ GUI.
In Dual mode : the left side of the touch-strip applies to the left deck, while the right side applies to the right deck. Once a side of the touch-strip is touched, you can then use the entire touch-strip to apply to the same deck.
While track is paused :
- Slide your finger on the touch-strip in order to fine-tune the position of the Audio Pointer
- Hold SHIFT down and then slide the touch-strip to fast seek through the track.
While track is playing :
- Slide your finger on the touch-strip to pitch-bend (temporary slow-down/speed-up the deck).
- Hold SHIFT down and then slide to Scratch the deck. - LOOP SIZE: : Turn this rotary to adjust the size used by automatic Loops , or to change the length of the current loop. Push the rotary to activate/deactivate an automatic Loop.
When a Loop is active, hold SHIFT down and then use the rotary to move the loop backwards/forward by 1 beat.
Hold the SYNC button [4] down and then use this rotary to adjust the Pitch (Tempo) of the track.
Hold the SYNC button [4] down and then push the rotary to reset Pitch to its default (zero) value. - LOOP SIZE DISPLAY: Shows the size (in beats) used by automatic Loops , or the current loop. When SYNC button is held down, the LCD will show the BPM current value of the track (and will blink while pitch resets)
- BROWSE: Turn this rotary to scroll through files or folders.
Push the rotary to toggle focus between Folders and Songs Lists. If focus is at the Folders list, push the rotary more than 2 seconds to open/close sub-folders.
Hold SHIFT down and then turn the rotary to cycle through all Browser windows (Folders, Songs and Sideview - useful to set focus to the Sideview)
Hold SHIFT and then push the rotary to open/close subfolders (if focus is at the Folders list), add selected track to the Automix List (if focus is at the Songs list) or cycle though the Sideview views (if focus is at the Sideview List)
The Browser of the default VirtualDJ GUI will be automatically set to "Zoom" view (larger Browser with Mini decks) while the BROWSE rotary is touched. The Browser will resume back to "normal" view 1 second after the BROWSE rotary is released or a Track is loaded (via the LOAD buttons) - LOAD: Loads the track that's selected on the browser on the corresponding deck.
Hold SHIFT and press this button to change the behavior of HOTCUE/SAMPLER (5) buttons between Hotcues Mode and Sampler Mode.
EFFECTS
Effects operate in two different modes:
The Single Effect mode offers one effect slot but more parameters controls per effect.
The Multi Effects mode offers 3 effect slots (to trigger more than 1 effect at the same time – chained effects).
The selection between those 2 modes is done by pressing MODE (12) button while SHIFT is held.
- FX ASSIGN: Use these buttons to clone the effects from one deck to another
Hold SHIFT down and then use these buttons to select Dual or Single mode for the Touch-strip and/or select a Deck (when in Single mode). see TOUCHSTRIP [6] - MODE button:
Activates a High/Low pass resonant filter effect.
Hold down SHIFT and press this button to toggle between Single FX and Multi FX modes. - FX1 button:
In Single FX mode, press this button to activate the selected effect. Hold down SHIFT to control the 1st button of the selected effect (if available).
In Multi FX mode, press this button to activate the effect selected on the 1st FX slot. Hold down SHIFT and press this button to select the next available effect for slot 1. - FX2 button:
In Single FX mode, press this button to select the previous available effect. Hold down SHIFT to control the 2nd button of the selected effect (if available).
In Multi FX mode, press this button to activate the effect selected on the 2nd FX slot. Hold down SHIFT and press this button to select the next available effect for slot 2. - FX3 button:
In Single FX mode, press this button to select the next available effect. Hold down SHIFT to control the 3rd button of the selected effect (if available).
In Multi FX mode, press this button to activate the effect selected on the 3rd FX slot. Hold down SHIFT and press this button to select the next available effect for slot 3. - MODE knob:
Controls the amount of High/Low pass resonant filter effect. Middle (12 o clock) position is "OFF" position (no filter applied)
You can also activate/deactivate the filter by using the MODE Button (12) - FX1 knob:
In Single FX mode, turn this knob to adjust the 1st parameter of the current effect (if available). Hold down SHIFT and turn this knob to adjust the 4th parameter of the current effect (if available).
In Multi FX mode, turn this knob to adjust the 1st parameter of the effect in slot 1 (if available). Hold down SHIFT and turn this knob to adjust the 2nd parameter of the effect in slot 1 (if available). - FX2 knob:
In Single FX mode, turn this knob to adjust the 2nd parameter of the current effect (if available). Hold down SHIFT and turn this knob to adjust the 5th parameter of the current effect (if available).
In Multi FX mode, turn this knob to adjust the 1st parameter of the effect in slot 2 (if available). Hold down SHIFT and turn this knob to adjust the 2nd parameter of the effect in slot 2 (if available). - FX3 knob:
In Single FX mode, turn this knob to adjust the 3rd parameter of the current effect (if available). Hold down SHIFT and turn this knob to adjust the 6th parameter of the current effect (if available).
In Multi FX mode, turn this knob to adjust the 1st parameter of the effect in slot 3 (if available). Hold down SHIFT and turn this knob to adjust the 2nd parameter of the effect in slot 3 (if available).
Quick Note:
Not all effects offer multiple switches (buttons) and parameters (knobs) to adjust their behavior. Therefore it's absolutely normal that in Single FX mode some buttons and / or knobs may do nothing when used.
