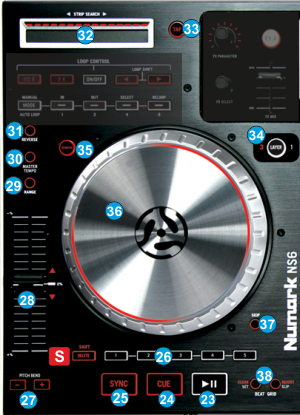
CUE. When the Deck is paused, you can set a temporary Cue Point by moving the Platter to place the Audio Pointer at the desired location and then pressing the Cue Button.
During playback, you can press the Cue Button to return the track to this Cue Point. (If you did not set a Cue Point, then it will return to the beginning of the track.).
If the Deck is paused, you can press and hold the Cue Button to play the track from the Temporary Cue Point. Releasing the Cue Button will return the track to the temporary Cue Point and pause it. To continue playback without returning to the Temporary Cue Point, press and hold the Cue Button, then press and hold the Play Button, and then release both buttons.
Press and hold SHIFT and then press this button to return to the beginning of the track.
SYNC. Press this button to automatically match the corresponding Deck's tempo with the opposite Deck's (or the Master Deck’s if using a 4 decks Skin) tempo and phase. Hold SHIFT down and then press this button to set this deck as Master Deck (for 4 decks skins - All other decks will sync to the Master Deck).
HOTCUES (1-5). Assigns a Hot Cue Point or returns the track to that Hot Cue Point. When a Hot Cue Button is unlit, you can assign a Hot Cue Point by pressing it at the desired point in your track. Once it is assigned, the Hot Cue Button will light. To return to that Hot Cue Point, simply press it. Press and hold SHIFT and then press a Hot Cue Button to delete its assigned Hot Cue Point.
PITCH BEND. Press and hold down these buttons to temporary speed up/slow down the song while pressed. When released, the track playback will return to the speed designated by the Pitch Fader
PITCH. Adjust the track's playback speed (tempo). The white LED next to the fader will light up when the software pitch value is set at 0%. The Red Up and Down Arrow LEDs will lit if the pitch position of the unit and the actual pitch of the software do not match, to indicate the direction you need to move the hardware fader in order to catch the software one.
RANGE. Press this button to adjust the range of the Pitch Fader ( to ±6%, ±8%, ±10%, ±12%, ±20%, ±25%, ±33%, ±50%, and ±100%).
Master TEMPO. Press this button to "lock" the track's pitch to its original key. The track's tempo will remain at the speed designated by the Pitch Fader
REVERSE/BLEEP. Press and hold this button down to play the track in reverse. Once released, the track will resume normal playback from where it would have been if you had never pressed the Bleep button (i.e., as if the track had been playing forward the whole time). Hold SHIFT down and then press this button to play the track in reverse. The led of this button will blink to indicate the reversed playback.
STRIP SEARCH. The length of this strip represents the length of the entire track. Place your finger on a point along this sensor to jump to that point in the track (song position).
TAP. Manually adjust the tempo of the song. Tap this button at the same tempo as the track (for at least 4 times) to help the software detect a different BPM reading (if needed).
DECK SELECT. Switch Left decks (1 and 3) and Right Decks (2 and 4). The left side of the NS6 will control VirtualDJ decks 1 or 3, and the right side will control VirtualDJ decks 2 or 4.
Scratch . Press this button to set the platter of the NS6 to either Scratch (Vinyl) or Bend (CD) mode. On Bend mode, use the outer part of the platter for pitch bending. Hold SHIFT down and then press this button to activate the Slip mode. When Slip mode is activated, several actions (scratching, HotCues and Loops ) will act temporary and the track will resume to the position it would have been if this action was never triggered.
JOG. Touch sensitive jogwheel. Use this wheel to Scratch , bend, fast seek through a track or even adjust the Loop In, Loop Out and Loop position depending on the assigned mode..
SKIP. Press and keep this button down and then use the jogwheel to navigate through the loaded track. The track will move forward/backwards by 1 beat steps, so the track will remain at sync.
BEAT GRID. These buttons offer the ability to manually adjust the CBG of the track. Similar operations are offered at the BPM Editor of VirtualDJ 8.
SLIP/ADJUST. Press and hold this button and then move the JOGWHEEL to shift the position of the CGB of the track. Hold SHIFT down and then press this button and use the JOGWHEEL to adjust the width of the CGB of the track (equal to adjust the BPM of the track)
SET/CLEAR. Press this button to set the current position of the track as the First Beat (BeatGrid Anchor) in order to easier adjust the Beatgrid width Hold SHIFT and then press this button to re-analyze the track and bring BPM and phase back to the original values as calculated by VirtualDJ.