PLAY: Plays / Pauses the track. Press and hold SHIFT and then press this button to "stutter-play" the track from the last set Cue Point.
CUE: When the Deck is paused, you can set a temporary Cue Point by moving the Platter to place the Audio Pointer at the desired location and then pressing the Cue Button.
During playback, you can press the Cue Button to return the track to this Cue Point. (If you did not set a Cue Point, then it will return to the beginning of the track.).
If the Deck is paused, you can press and hold the Cue Button to play the track from the Temporary Cue Point. Releasing the Cue Button will return the track to the temporary Cue Point and pause it. To continue playback without returning to the Temporary Cue Point, press and hold the Cue Button, then press and hold the Play Button, and then release both buttons.
Press and hold SHIFT and then press this button to return to the beginning of the track.
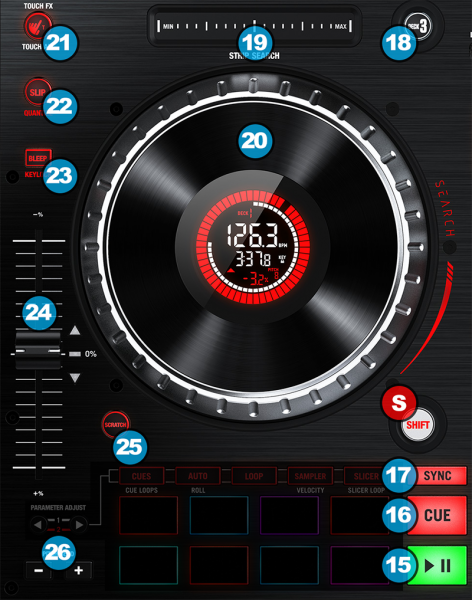
SYNC: Press this button to automatically match the corresponding Deck's tempo and phase with the opposite Deck's (or the Master Deck’s if using a 4 decks Skin) tempo and phase. Hold SHIFT down and then press this button to set this deck as Master Deck (for 4 decks skins).
DECK SWITCH: Press this button to toggle control between decks 1&3 for the left side or 2&4 for the right side
STRIP SEARCH: The length of this strip represents the length of the entire track. Place your finger on a point along this sensor to jump to that point in the track (song position). While your finger touches the strip, the track will start a temporary playback (if it was not playing before) in order to preview that area of the track. Lift your finger from the strip to stop playback. Important notice: In order to avoid accidental track jumps when you manipulate FX, the needle search does not operate when the deck is on air. If you want to use the strip while a deck is on air please hold down SHIFT first, and then touch the strip.
JOG: Touch sensitive jogwheel. Use the jogwheel to Scratch (if Vinyl mode is selected) or pitch bend. Hold SHIFT down and then use the Jogwheel to fast search through the track, but keep the phase synced. The Jogwheel also offers Loop In and Loop Out point adjustment (see Manual Loop Pads mode)
TOUCH EQ/FX (Left side): Press this button once to enable the FX TOUCH Mode. On this Mode the Touch Capacitors of the FX knobs trigger the Effects while touched. Press this button a second time to enable the EQ/FX TOUCH Mode. Led will blink to indicate this mode. On this Mode, the Touch Capacitors of the FX knobs trigger the Effects while touched (same as FX TOUCH Mode), and additionally the EQ Touch Capacitors will kill the corresponding frequencies while touched. Press this button a third time to turn off FX TOUCH Mode.
FILTER MODE (Right side): Press this button once to enable the FILTER ROLL Mode (LED lights on). On this mode, operating the filter knob will also engage a variable length loop roll effect. Press this button a second time to enable the FILTER FX Mode (LED Flashes). On this mode, operating the filter knob will also trigger the effect of the first Effect Slot. Press this button a third time to turn off FILTER FX Mode.
SLIP: Press this button to activate the Slip mode. Several software functions (such as Jogwheel movements, HotCues and Loops ) will apply temporary on the track, and the track will return to the position it would have been when as if those functions were not triggered. Hold SHIFT and press this button to toggle Quantize on/off. When Quantize is enabled, several features as setting hotcues, jumping between hotcues, setting Loops e.t.c. will be quantized on the CBG of the track.
BLEEP: While this button is held, the playback of the track will be reversed. When released the track will resume normal playback from where it would have been if you had never engaged the Bleep function (i.e., as if the track had been playing forward the whole time). Hold SHIFT and press this button to toggle Key Lock on/off. When Key Lock is activated the tracks key will "lock" at the current value. The track's tempo will remain at the speed designated by the Pitch Fader.
PITCH: Adjust the track's playback speed (tempo). The white LED next to the fader will light up when the unit’s fader is set at 0%. The Red Up and Down Arrow LEDs will lit if the pitch position of the unit and the actual pitch of the software do not match, to indicate the direction you need to move the hardware fader in order to catch the software one.
Scratch : Press this button to set the Jogwheel to Vinyl ( Scratch ) or CD (Bend) mode. When Vinyl mode is active, you can still use the outer part of the Jogwheel to bend (temporary speed up – slow down the tempo of the track). Hold SHIFT and press this button to switch Time Display (30) between Elapsed and Remain modes.
PITCH BEND: Press and hold down to temporary speed up/slow down the song while pressed. When released, the track playback will return to the speed designated by the Pitch Fader
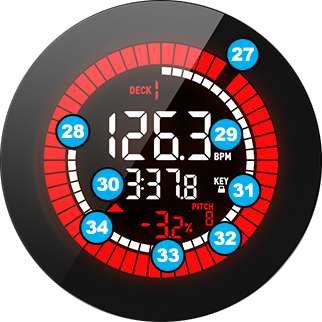
RED RING - VINYL ROTATION: Indicates the position of the software jogwheel - shows rotation. You can switch rotation behavior from VirtualDJ Settings RPM between 33 RPM, 45RPM and 4 Beats Per Round.
WHITE RING - TRACK PROGRESS: Indicates the track's position in time, starting with an empty circle and ending to a full circle when track reaches its end. The white circle will start blink when track reaches 30 seconds before end.
BPM: Displays the current BPM value of the track.
TIME: Displays the Remain (with a minus mark) or the Elapsed Time of the track. Time mode can be selected by pressing SHIFT+ Scratch (25)
KEY LOCK: Will be displayed when the Key-Lock is enabled on the deck.
PITCH RANGE: Displays the current pitch range used by the pitch slider
PITCH: Displays the current pitch adjustment of the track
PITCH ARROWS: The arrows will turn on if the actual position of the Pitch Fader and the software Pitch value don't match and they will indicate the direction the hardware Pitch Fader needs to be moved to, in order to catch the software value. This may happen if the SYNC button is used, or if ResetPitchOnLoad option is enabled.