


DDJ-SB3
Controles de Deck
S SHIFT. Hold this button down to access secondary functions of the Pioneer DDJ-SB3, as described in this manual
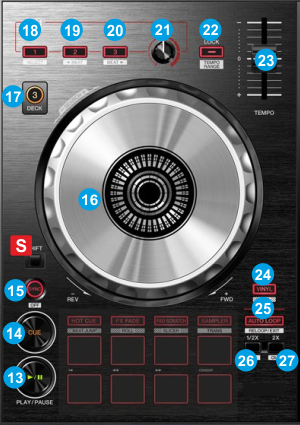
- PLAY: Plays-Pauses the track. If SHIFT is pressed it plays the track in Stutter.
- CUE: If the track is playing, pauses and goes to the last cue point. If the track is paused is paused, Sets the current position as cue point, and previews the cue as long as the button is pressed. If SHIFT is pressed, it jumps to the beginning of the track.
- SYNC: Syncs the tempo and phase of this deck with the deck that is set as Master (indicated with the M button in the 4 Decks default skin). The Master Deck is automatically by default (auto mode)
Hold SHIFT down and then use this button to manually set a deck as Master .
Once a Deck is manually set as Master , the auto-selection of the Master Deck will not be available. To return to the auto-selection, you will need to press the same button again on the Deck that is currently set as Master . - JOG: Touch sensitive platter for scratching (vinyl mode) or bending (CD Mode) depending on the VINYL mode (24).
Hold SHIFT and use the JOG in Seek (Search) mode. - DECK.
Use the left-side button to assign Deck 1 or Deck 3 as Left selected Deck. When the LED is lit Deck 3 will be controlled by the left side of the DDJ-SB3.
Use the right-side button to assign Deck 2 or Deck 4 as Right selected Deck. When the LED is lit, Deck 4 will be controlled by the right side of the DDJ-SB3.
Note: Due to a firmware limitation, these buttons will not work and swap Decks, unless the DDJ-SB3 sound card is used in Audio Setup. - FX ON 1: Press this button to activate the selected effect of slot 1. Hold SHIFT and then press this button to select the next available Effect from the list for Effect slot 1
- FX ON 2: Press this button to activate the selected effect of slot 2. Hold SHIFT and then press this button to select the next available Effect from the list for Effect slot 2
- FX ON 3: Press this button to activate the selected effect of slot 3. Hold SHIFT and then press this button to select the next available Effect from the list for Effect slot 3
- FX LEVEL KNOB: Use this knob to adjust the 1st parameter of the selected effects from all effect slots. Hold SHIFT down and then use this knob to control the 2nd parameter of the selected effects from all effect slots.
- KEYLOCK: Press this button to enable/disable the Master Tempo (Key Lock) of the deck.
Hold SHIFT and press this button to cycle through the available Pitch ranges for the PITCH/Tempo Slider. - PITCH: Adjusts the tempo of the track.
- VINYL: Sets the Jog of the deck to Bend (CD) or Scratch (Vinyl) Mode.
Hold SHIFT down and then use this button to enable/disable Slip mode. When Slip mode is enabled, several functions (scratching, HotCues, Loops etc.) will act temporary and the track will resume to the position it would have been if this function was never triggered. - AUTOLOOP: Use this button to enable/disable an Auto-Loop of the selected size of Beats.
Hold SHIFT and then use this button to enable the last triggered loop (and jump to its position). - LOOP 1/2: Use this button to half the size of the Loop.
When not in Loop, hold SHIFT down and then use this button to set current track's position as the start point of a manual loop.
When in Loop, hold SHIFT down and then use this button to enable/disable Loop In Adjust mode and then use the jogwheel to fine-adjust the start point of the loop. - LOOP 2X: Use this button to double the size of the Loop.
When not in Loop, hold SHIFT down and then use this button to set current track's position as the end point of a manual loop.
When in Loop, hold SHIFT down and then use this button to enable/disable Loop Out Adjust mode and then use the jogwheel to fine-adjust the end point of the loop.