


DDJ-SB3
FRONT & REAR PANELS

- HEADPHONES SOCKET Connect your Headphones for monitoring using the 1/8" socket. The level of this output is controlled from the HEADPHONE LEVEL knob at the top panel
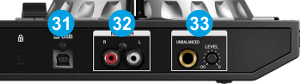
- USB. Connect the DDJ-SB3 with your computer via a USB port using the provided USB cable
- Master OUTPUT (RCA). Un-balanced Main Output. Connect your amplifier or amplified speakers using common RCA cables. The Level of this Output is controlled from the top panel
- MIC INPUT. Connect your Microphone using a proper 1/4" cable/adapter The Volume of this Input is controlled from the knob at the side of this socket.
Note that the Microphone Input is not part of the USB Audio Interface and its signal will be directly routed to the Master Output of the DDJ-SB3, thus it cannot be included to the Audio setup of VirtualDJ, nor can be recorded within VirtualDJ.
