- Guía Rápida
- Carátula
- Sección Superior
- Decks
- Mixer
- Navegador
- Base de Datos
- Separación de Pistas (Stems) 2.0
- Editores
- Configuración
- Control Remoto de VirtualDJ
- Apendice


Manual del Usuario
Configuración de Audio
VirtualDJ has the ability to create endless Audio Configurations depending on the hardware used. From a simple speaker connection to a multi-channel sound card running multiple inputs and outputs; VirtualDJ can route sound to and from just about any hardware device on the market today.
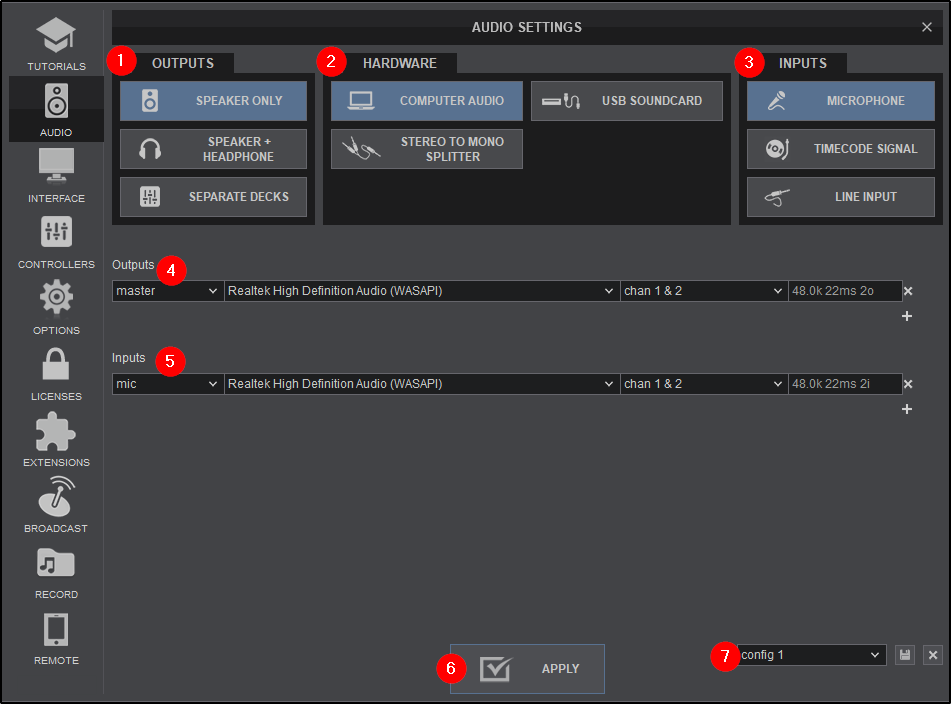
The Audio Settings menu is a hybrid compiled of basic icons to click on as well as Advanced configurations. The Icons can be clicked on and VirtualDJ will configure the audio with the most common settings automatically in the advanced menu. From there, audio configurations can be altered added and removed depending on the audio interface’s capabilities and the requirements of the user.
- OUTPUT OPTIONS. Provides the following Output routing options:
SPEAKER ONLY Audio Setup with only a Master Output. SPEAKER + HEADPHONE Audio Setup with Master Output and Headphones (prelisten). SEPARATE DECKS Audio Setup with individual audio outputs for each available deck. - HARDWARE. Provides the following Audio Hardware options:
COMPUTER AUDIO VirtualDJ will use the default soundcard of the computer USB SOUNDCARD VirtualDJ will route the sound from separately defined channels to different sound cards (ie. Master and Headphones). STEREO TO MONO SPLITTER VirtualDJ will split a single stereo output into 2 separate mono channels (requires a Y-splitter adapter/cable).
VirtualDJ will also display any additionally connected sound cards and controllers with audio if they are natively supported in the software. Clicking on the button will auto-create a pre-defined Audio Setup for the device that can be altered if required. - INPUT OPTIONS. Provides the following Input options:
MICROPHONE Assigns an Input channel of a sound card as a microphone input. TIMECODE SIGNAL Controls VirtualDJ with timecoded vinyl’s or CDs (see Timecode) LINE INPUT Assign an Input channel of a sound card as an Line Input (AUX) ADVANCED AUDIO SETTINGS
Each time a choice is made in the Basic Audio Settings, lines are auto-generated in the Adavanced Audio Settings area based on the selection(s) made. The lines in these fields can be used to modify the Source, the SoundCard, and/or it’s Channels. - OUTPUTS. Displays the Output Source ( Master , Headphones, etc), Sound card used for the source, channels that it will output to as well as the sample rate and bit depth of the soundcard. These fields can be modified by clicking on it to reveal the drop-down menu of all fields.
- INPUTS. Displays the Input Source (Mic, Timecode, etc), Sound card used for the source, channels that it will input to as well as the sample rate and bit depth of the soundcard. These fields can be modified by clicking on it to reveal the drop-down menu of all fields.
Note: Sample Rate and Bit Depth cannot be changed in VirtualDJ but may be able to be changed in a Driver utility panel or in the computer’s operating system. Consult the manufacturer's documentation for further information on settings and adjustments. - APPLY. Saves the current configuration and applies the audio routing.
- AUDIO PROFILE. Stores different Audio configurations for quick access.
Each time a different Audio Setup is configured it is stored as config 1 (default name). It can then be renamed and saved as an Audio Profile by typing over the existing text and clicking the save icon. Multiple profiles can be created and restored from the list on the bottom right of Audio Settings. Once the desired Sound setup is created or selected, click APPLY to enable it. 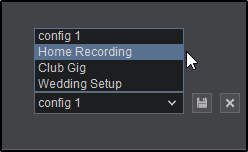
BASIC AUDIO SETTINGS
Using Audio Profiles