- Guía Rápida
- Carátula
- Sección Superior
- Decks
- Mixer
- Navegador
- Base de Datos
- Separación de Pistas (Stems) 2.0
- Editores
- Configuración
- Control Remoto de VirtualDJ
- Apendice


Manual del Usuario
Sampler
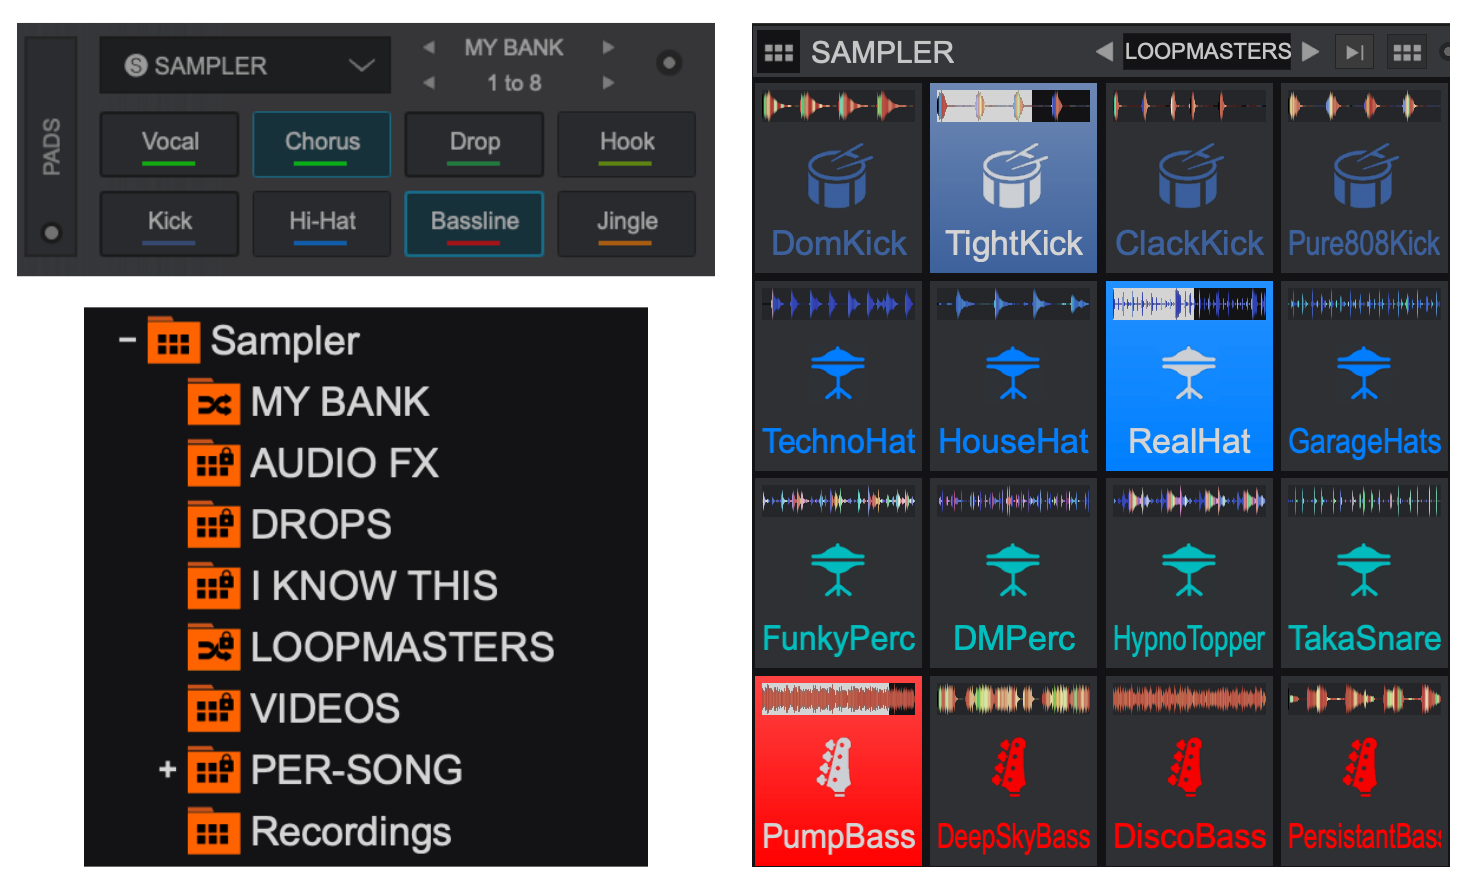
SAMPLE BANKS
Samples that are played in the Sampler can be grouped into Sample Banks. A bank is a collection of individual samples, that can quickly be recalled to change the available samples.
Banks have properties such as locked/unlocked and regular/stemSwap with the ability to assign samples into mutually exclusive "groups".
VirtualDJ comes with pre-defined sample banks to get started, as well as empty banks that are workflow specific:
PRE-DEFINED BANKS
- AUDIO FX
- DROPS
- I KNOW THIS
- LOOPMASTERS - Licensed by https://www.loopmasters.com/
- VIDEOS
WORKFLOW BANKS
- MY BANK - An empty bank to start creating samples.
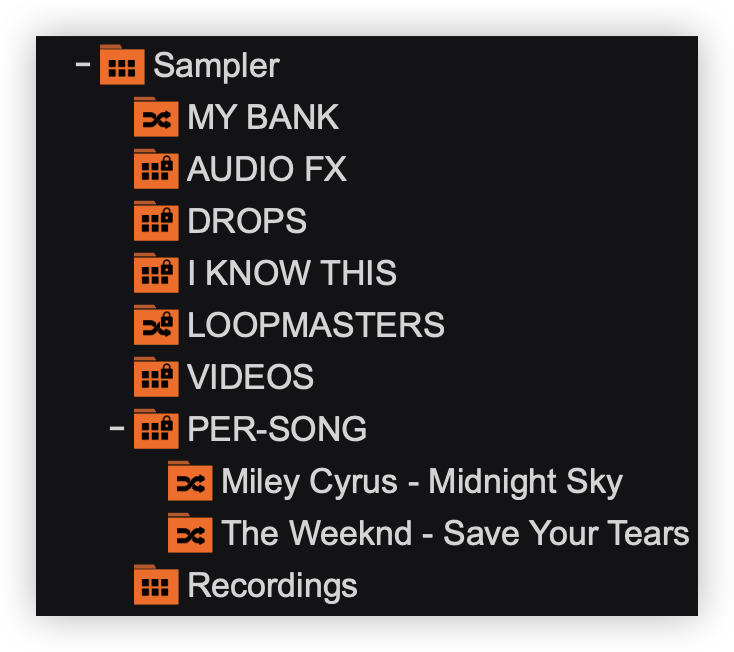
- PER-SONG - Associates a set of samples with a specific song. Any samples dropped or recorded in the PER-SONG bank will only show on the deck where this song is loaded, and will automatically show again next time the song is loaded.
- Recordings - Stores samples that have been recorded from the Master Output, Microphone, and Loop Panel.
Unlimited Sample Banks can be created and organized into sub-folders.
* Default banks can be hidden by going to Options and setting samplerHideDefaultBanks to YES
RECORDING A SAMPLE
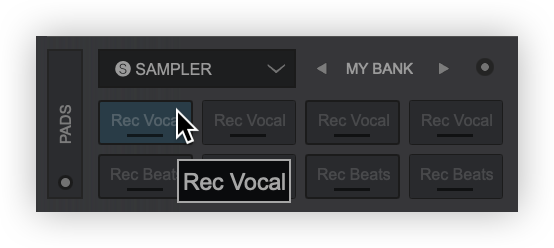
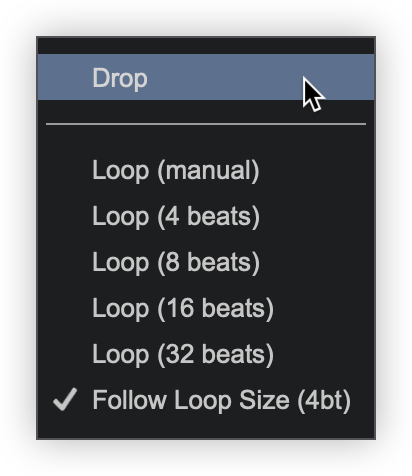
When a Sample Bank is "unlocked", samples can easily be recorded on the fly from the Sampler Pads page. The default setting is set to Record a loop with Stems enabled, but can also be recorded as a drop with or without Stems (full track).
- With a deck loaded select any unlocked bank (like My Bank) from the Pad Bank parameter selection. Find the portion of the track to be recorded and click on the pad to Record . The deck does not have to be playing to Record a sample.
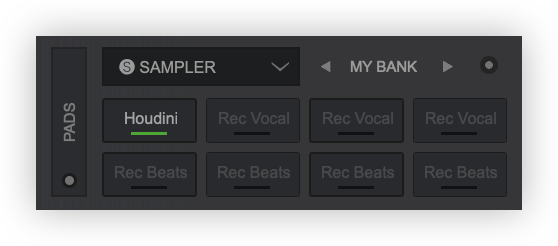
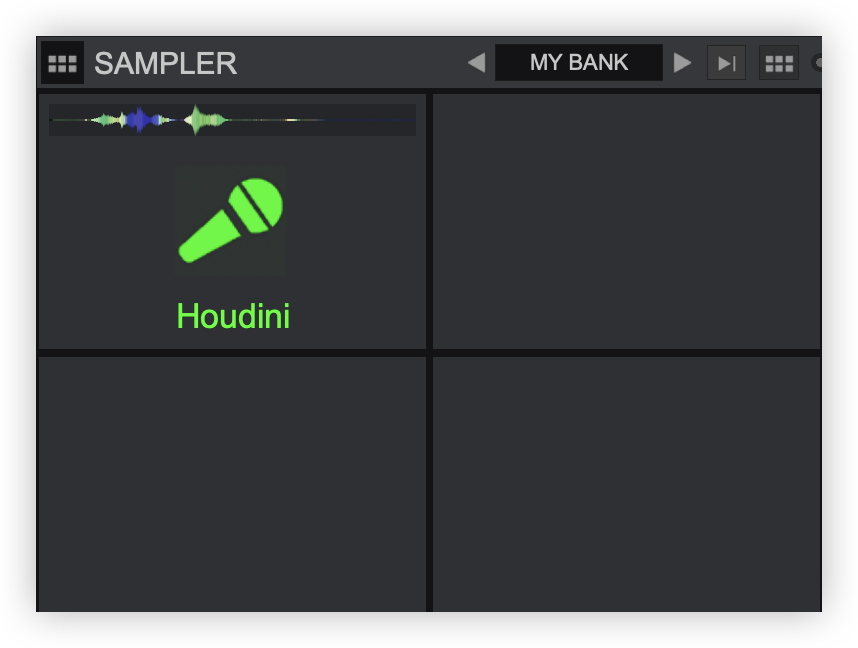
- The recording will display on the Pad with the name of the track, and color depending on what Stem (if any) is recorded.
- The recording will also display in the Sampler Sideview with the name of the track, color, and icon depending on what Stem (if any) is recorded.
Drops and Manual Loops are recorded by either pressing the pad button to start recording and pressing again to stop, or holding the pad button down for the duration of the recording. The pad will display the duration of the recording for drops (in seconds) or the manual loop (in beats) while the recording is in progress.
For automatic Loops , the pad button is pressed once (not held) and the sample is automatically recorded from the playhead position. The track does not need to be playing on a deck.
STEMSWAP BANKS
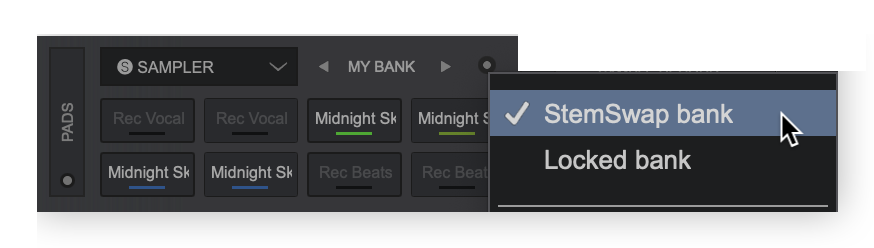
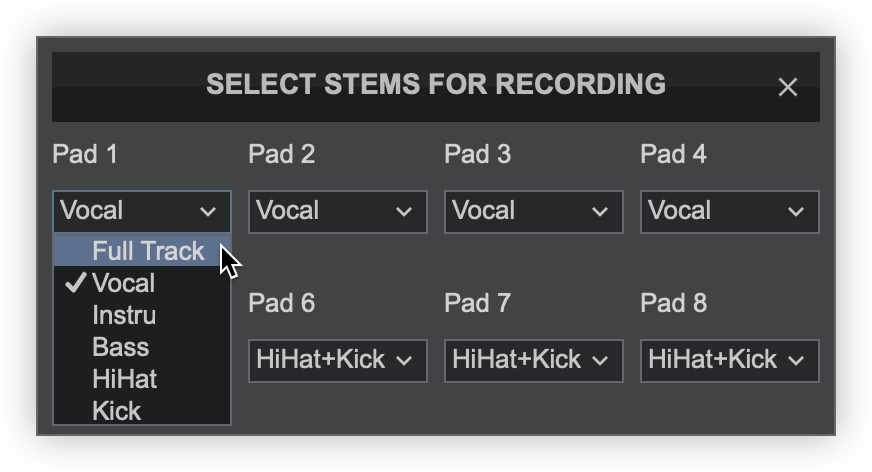
When a bank is set as StemSwap bank, it will Record specific Stems instead of the full track.
When played, Stems samples from a StemSwap bank will mute the corresponding Stem from the track playing on the deck where the sample was triggered, effectively "swapping" the Stems .
Which Stem (s) that are recorded can be customized on each individual pad in the Record slots... menu.
Note: When a bank is set to StemSwap, it will always play on the trigger deck (even if the sample is not a Stem loop that can swap), and will be affected by the deck's volume and crossfader.
SIDEVIEW Sampler
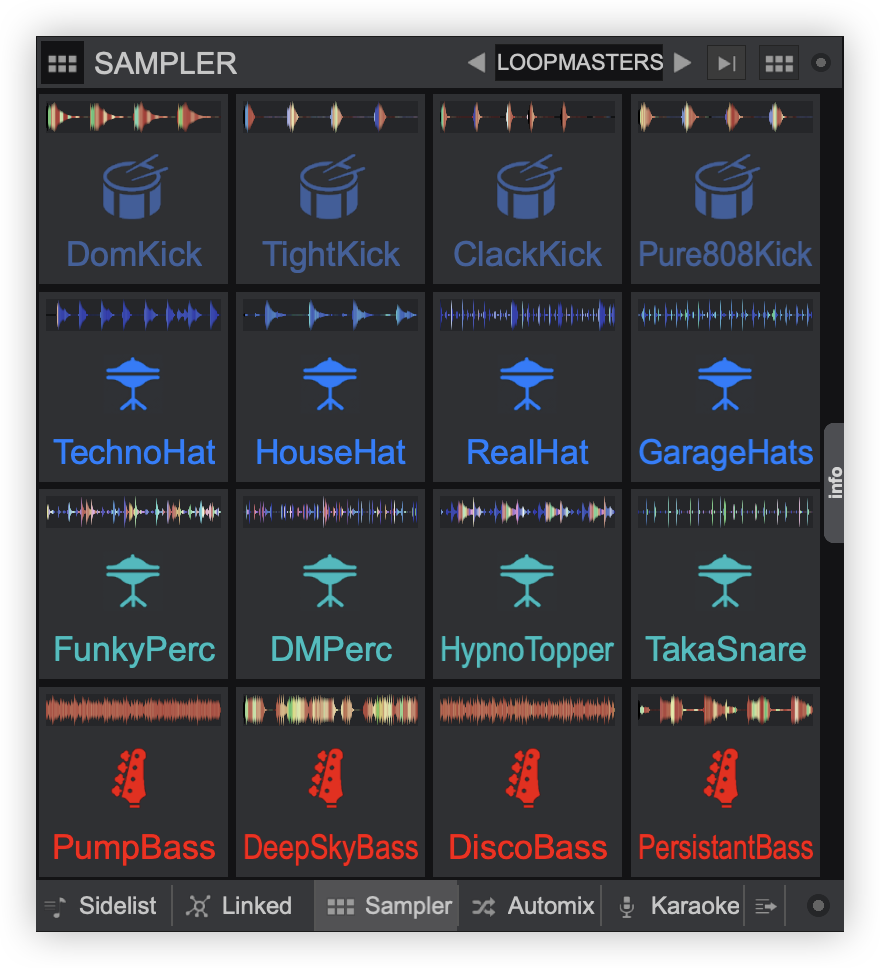
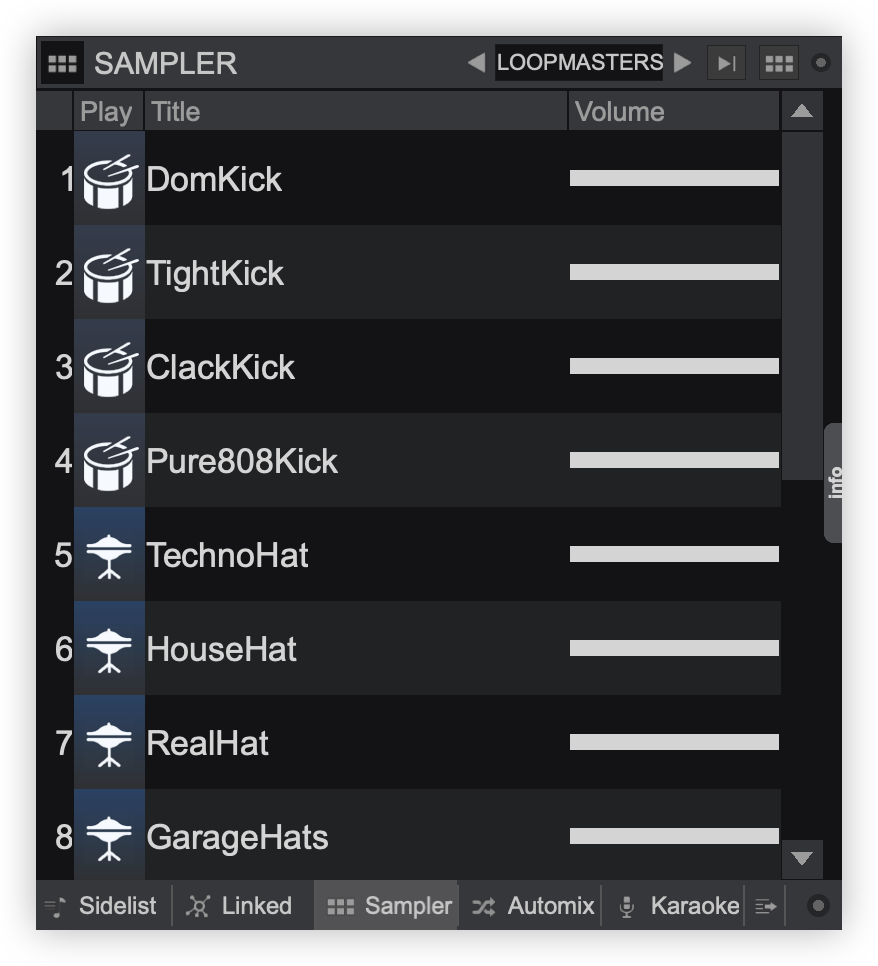
The Sampler view of the Sideview offers 2 different views; a Trigger Pad and a List View. The Trigger Pad view offers large buttons ( Pads ) to trigger a Sample, with an icon, the name and a progress bar. The List view also offers all possible information (Volume, Group name, Mode, Color, etc). You may also choose which fields you wish to see in the List View by right-clicking on the header. Click on a Sampler Pad or use the Play field in List view to trigger/play/stop a Sample.
The view can be toggled by pressing the view display button.

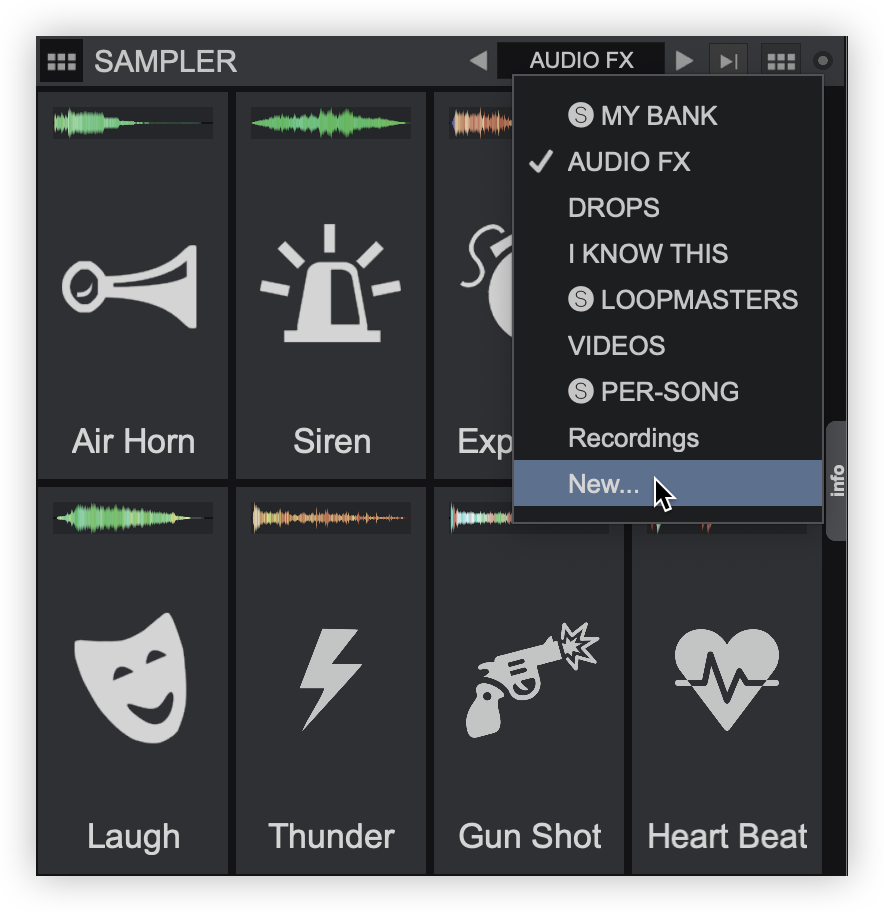
- SAMPLE BANK. The Sampler can have unlimited banks and each bank can have up to 64 samples. Use the arrow buttons to navigate through the available banks or click inside the name box to get a list with all the available banks. Choose New... from the menu to create a new Bank. Sampler banks can be renamed and deleted from the Sampler folder in the Folder List by right-clicking on the desired bank.
- TRIGGER MODE. Click on the Trigger Mode button to toggle through one of the available Trigger Modes. Trigger Mode is a global selection (applies to all Banks). However a Group can have its own trigger mode (see Sample Editor)
 On/Off
Press a Sampler Pad to start playing a sample from the beginning. Press the same Sample pad again to stop the sample.  Hold
HoldThe Sample will play from the beginning as long as the Sampler Pad is pressed.  Stutter
The Sample will play from the beginning, each time you trigger a Sampler Pad. Right-click to stop the Sample  Unmute
The Sample will be muted if the Sampler Pad is not pressed. Right-click to stop the Sample. - VIEW DISPLAY. Toggles between Pad View and List View
- Sampler OPTIONS. The Sampler Options menu includes settings to customize how the Sampler behaves:
Locked bank Locks/Unlocks the Sample Bank. When a bank is locked samples cannot be added, removed or recorded. Audio output Selects the audio output behaviour for Regular Banks. Audio can be routed to the Master , Trigger Deck, or a specific deck. StemSwap Banks are always routed through the Trigger deck and cannot be changed (except when triggered from the SideView). The ability to Apply Deck Effects is also provided. Trigger Mode Option to change how the Sampler behaves with different play functions (see 2. Trigger Mode) Pads Layout
(Pad view only)You can define the layout of the Trigger Pad view, by selecting the number of used columns (1 to 8). VirtualDJ will then automatically fill the necessary rows to show all the Samples of the Bank. By default the view is Automatic (VirtualDJ will choose the best view).
If a MIDI controller with pre-defined columns, rows and sides is connected and Automatic is chosen as the layout, VirtualDJ will then reorder the Pads to match the layout of the controller.Show waveforms
(Pad view only)Displays the waveform of the sample when in Pad View. Image Size
(Pad view only)Optionally change the display image size on the Pads :
Small - Small image with text
Large - Large image with text
Full - Large image with no textShow effects Provides an FX Tool Bar at the top of the Sampler to apply and control effects as well as the Sampler 's volume. Edit bank in browser
(Pad view only)Opens the sample bank in the browser.

CREATING SAMPLE BANKS
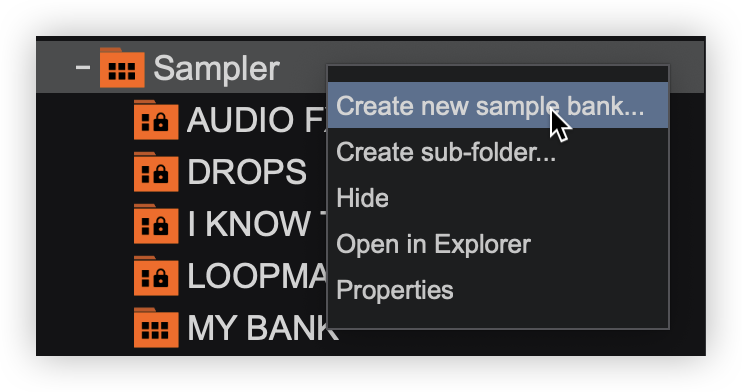
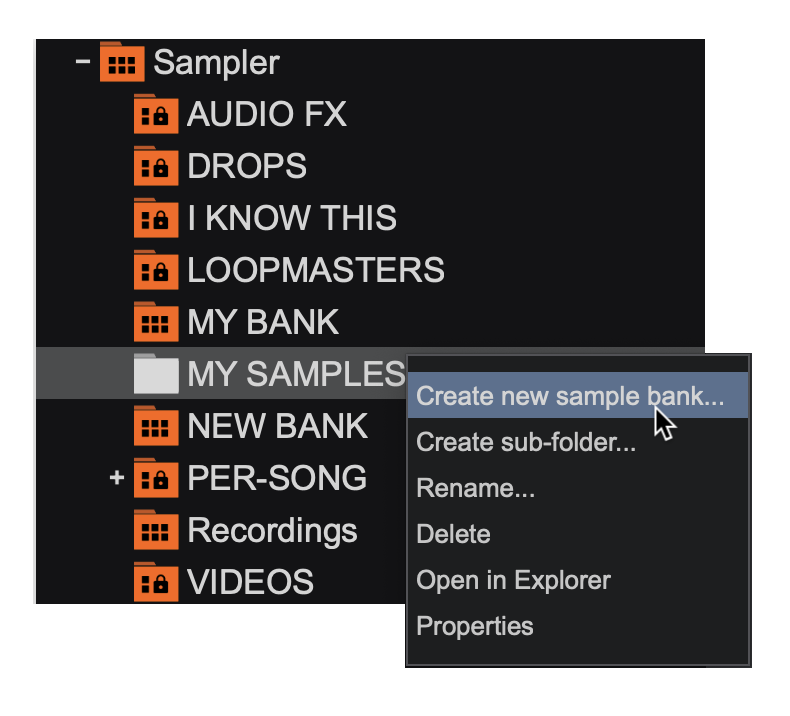
- Navigate to the Folder list and locate the Sampler folder.
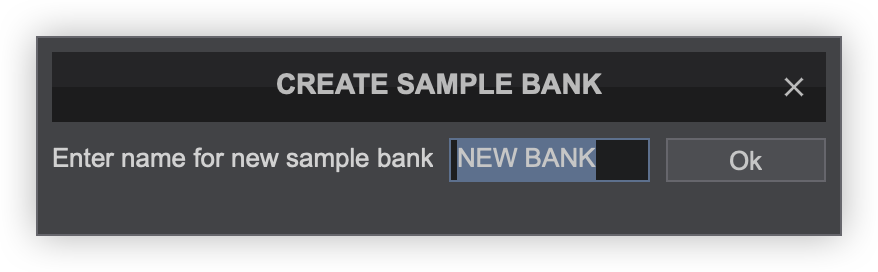
Right-click on the folder and select Create new sample bank... - A pop-up box will appear to give the new sample bank a name. Type in the preferred name for the bank and click OK or press enter on your keyboard.
- Once the new sample bank is created it will appear in the Sampler folder in alphabetical order.
Banks can be reordered by dragging and dropping up or down the Sampler folder list.
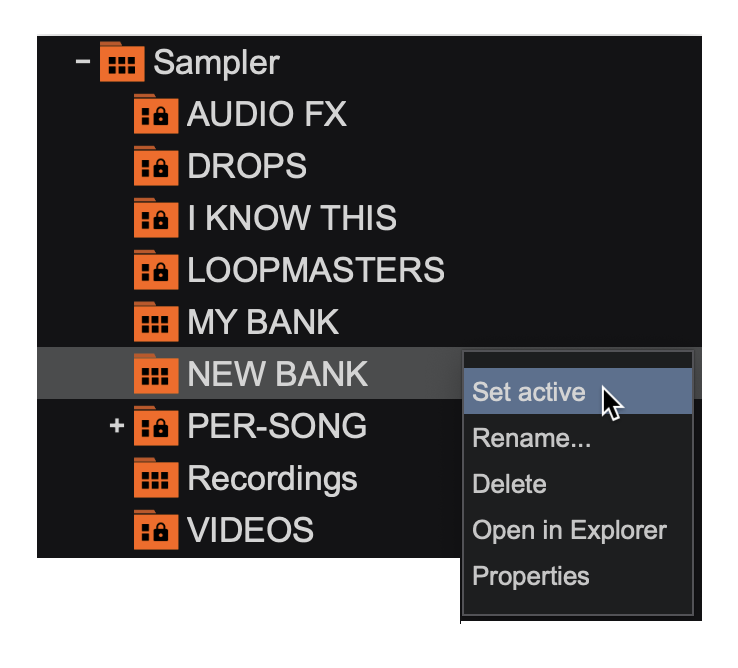
Right-clicking on the sample bank will give the options to Set active, Rename..., Delete, Open in Explorer, and Properties.
Clicking this option will instantly create a bank (without the option to name it) for on the fly convenience and will be stored in the Sampler folder list as New bank. The bank can later be renamed or deleted by using the above steps.
CREATING AND ORGANIZING SUB-FOLDERS
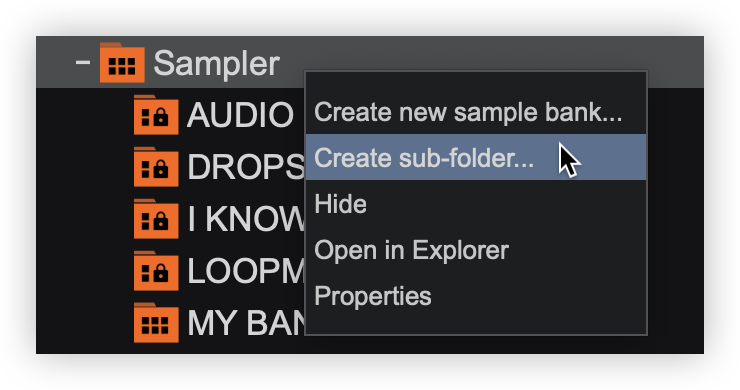
- Navigate to the Folder list and locate the Sampler folder.
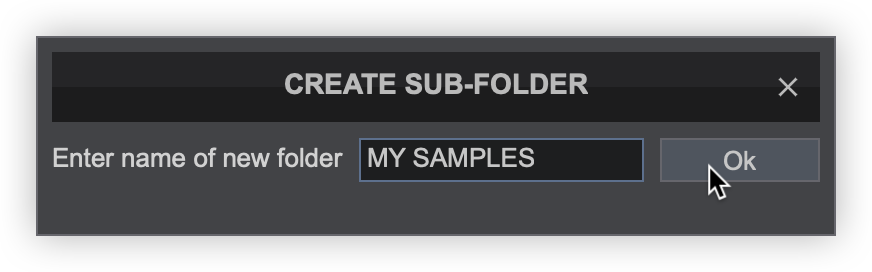
Right-click on the folder and select Create sub-folder... - A pop-up box will appear to give the new sub-folder a name. Type in the preferred name for the subfolder and click OK or press enter on your keyboard.
- Once the new sub-folder is created it will appear in the Sampler folder in alphabetical order.
Sub-folders can be reordered by dragging and dropping up or down the Sampler folder list.
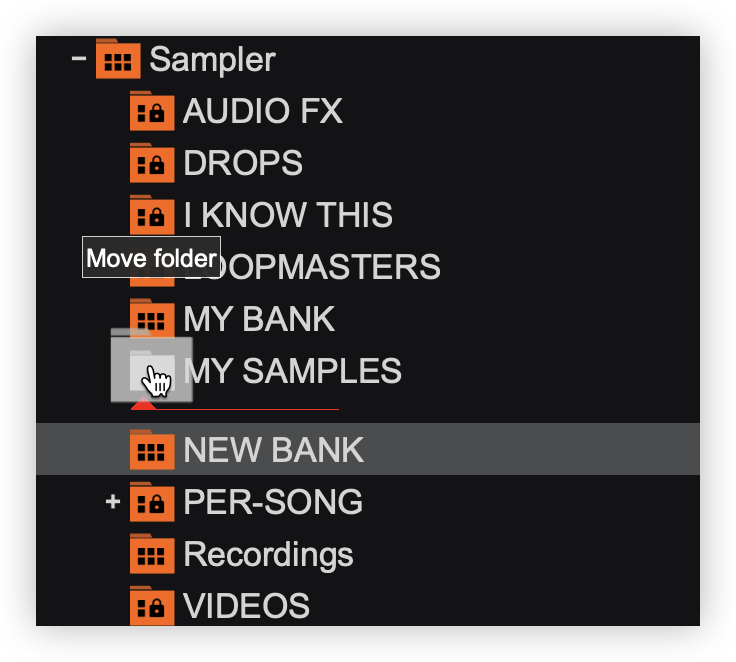
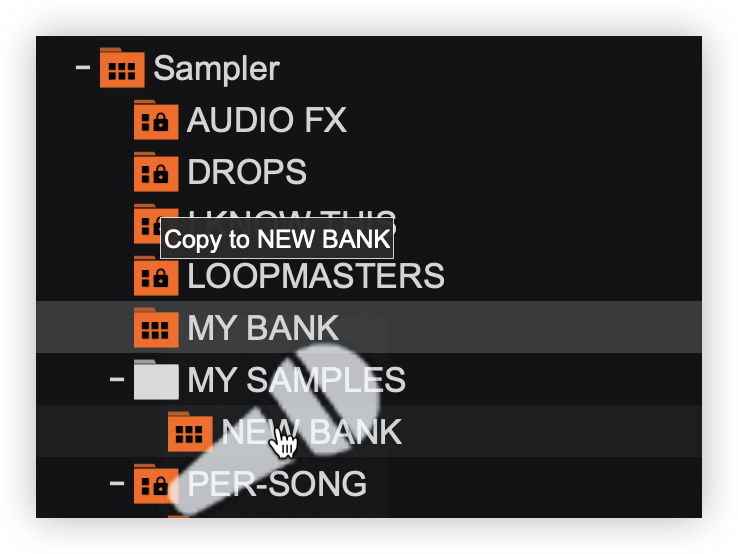
Right-clicking on the sub-folder will give the options to Create new sample bank..., Create sub-folder..., Rename..., Delete, Open in Explorer, and Properties. If creating a new sample bank or sub-folder it will be nested in the sub-folder it was created in. - Sample banks can be moved into sub-folders by dragging the bank onto the subfolder icon.
- Once the bank is moved to the sub-folder it will now appear nested in that folder. To remove it from a specific sub-folder, the bank can be dragged to another sub-folder or dragged to the main Sampler folder.

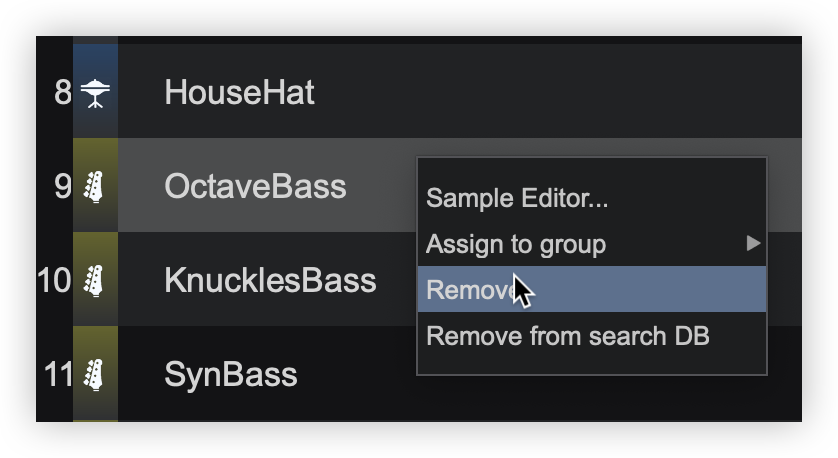
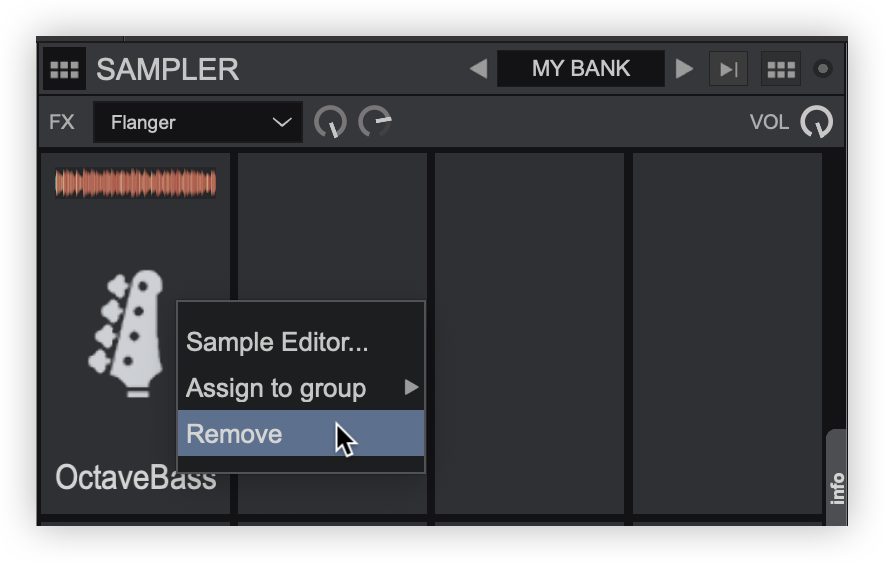
ADDING, REMOVING AND ORGANIZING SAMPLES
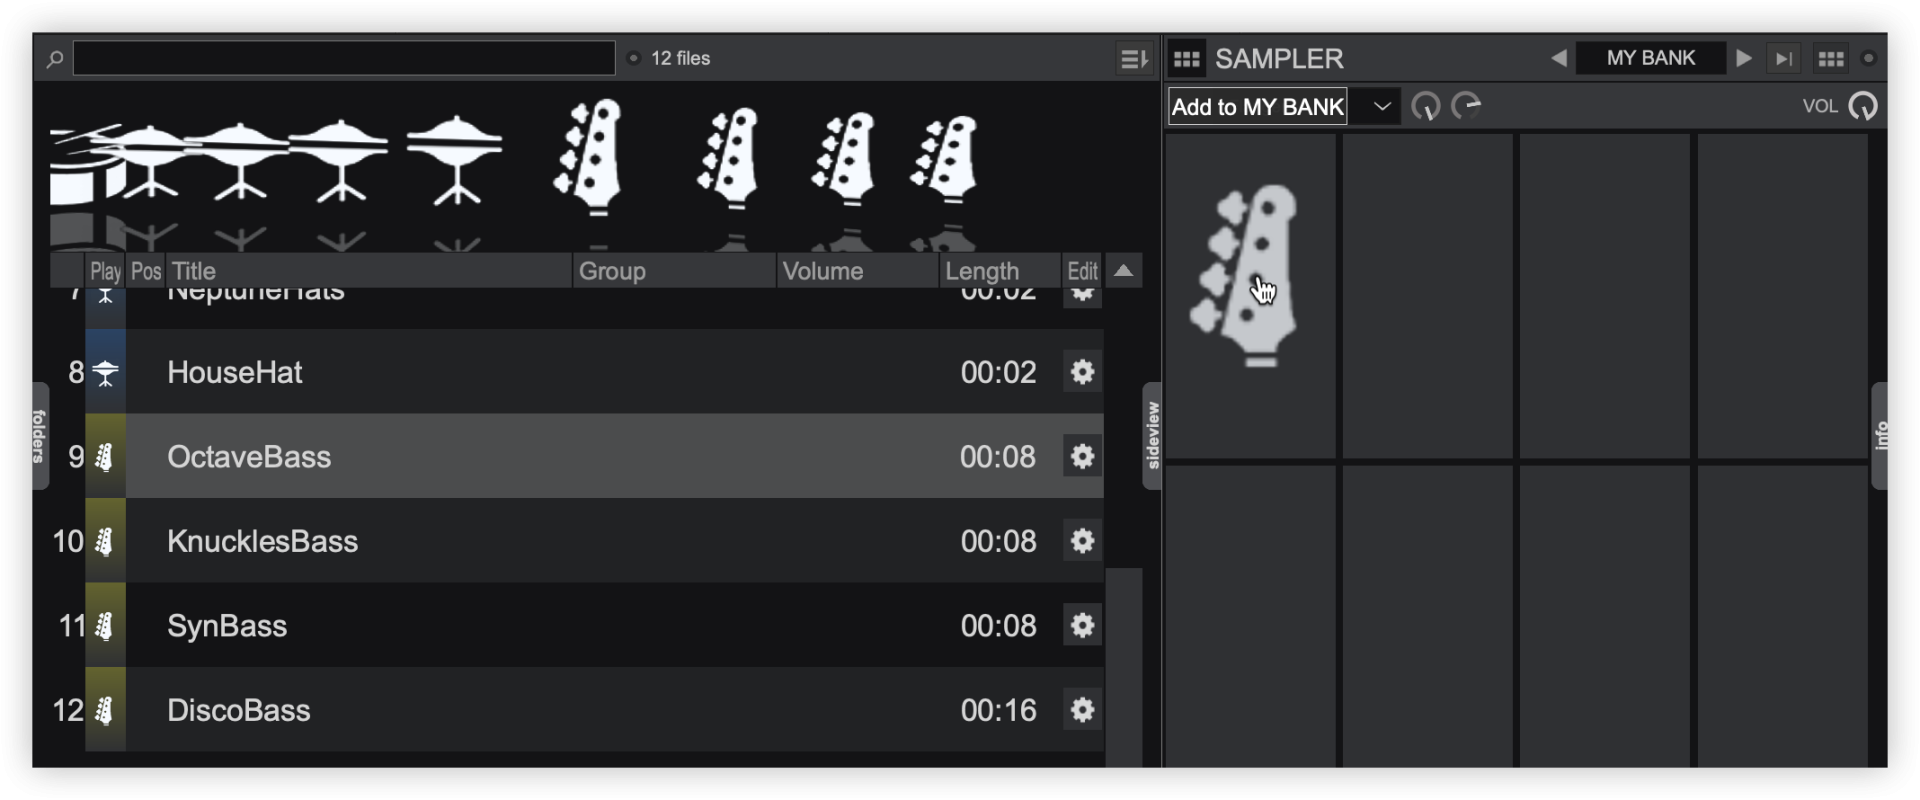
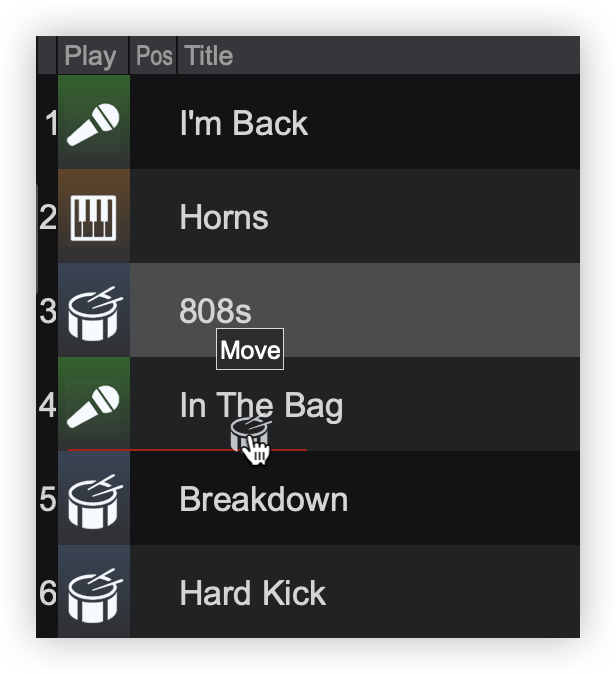
Changing the order in the browser will reflect in the Sampler Sideview as well as on the Deck Pads .
ADDITIONAL RECORDING OPTIONS
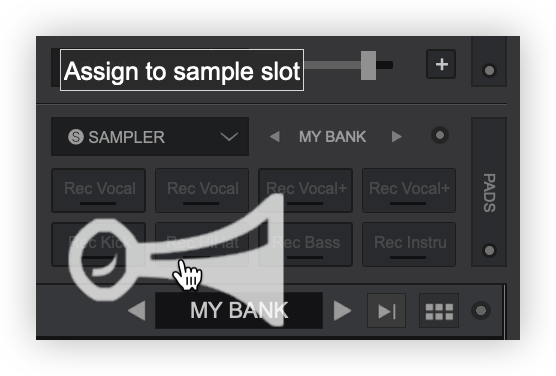
You can also Record a sample from either a specific deck, Master Output or even from the Microphone Input using the REC buttons available in the GUI. Once a Sample is recorded it will be automatically added in the Recordings sub-folder of the Sampler and its contents will be displayed in the File list. Samples will be named automatically depending on the source ( Master , mic or file name).
You can then pre-listen to your Sample and choose to add it to a Sampler Bank by dragging and dropping the sample to the Sampler sideview or a Sampler folder in the Folder List.
For more advanced Sampler operations see Sample Editor.